
In this tutorial, I will show you how to download, install, and use SnmpB MIB Browser on Windows 10/8/7. SnmpB is an open-source (GPLv2) and a 100% free SNMP MIB browser. I’m a big fan of the open-source movement, and this is something that I have been looking for a long time – a fully functional and free MIB browser/walker that has these features:
- MIB management – browse, add, load, and edit your MIB files;
- Support for all SNMP versions – SNMPv1, SNMPv2c, and SNMPv3;
- SNMP Walk/Get/Set option – send SNMP queries to devices (agents);
- Agent discovery – detect and identify SNMP-enabled devices on the network;
- SNMP trap receiver – receive SNMP trap events from devices on the network;
- Install on any operating system – Windows, Linux, Mac, BSD.
You need a little knowledge about SNMP protocol before you can use MIB browser. If you don’t know what MIB, OID, and agent are and how they work, please take a few minutes to read my post: What is SNMP? How does it work? Learn with examples.
However, if you have a basic understanding of SNMP, then let’s install and learn how to use MIB browser!
Check out Best Monitoring Tools Online MIB browser that has more than 13 0000 MIB files. You can browse MIB files or download them in various formats (MIB, CSV, JSON, YAML).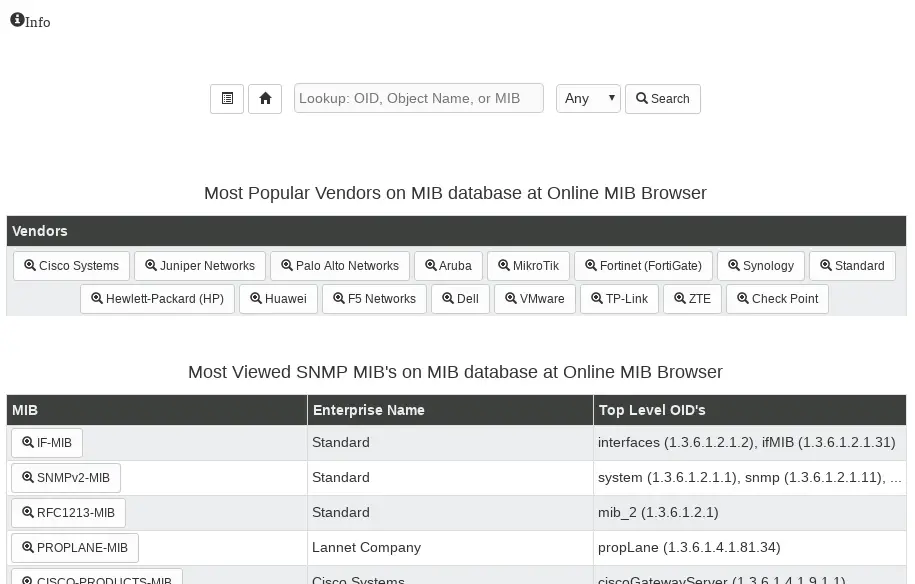
Table of Contents
Step 1: Install SnmpB MIB browser on Windows
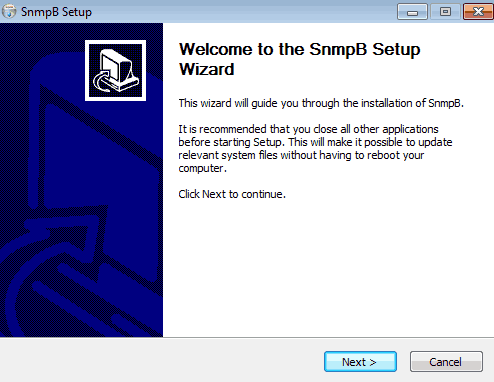
Download SnmpB MIB Browser from sourceforge.net (click here) and install it using the setup wizard. Just click “Next” on each page and don’t change the default setting.
After the installation, Windows should ask you to allow access for SnmpB to communicate over the network, you must click “Allow access” if you are planning to send SNMP queries (UDP 161) to network devices.
This guide will focus on how to install SnmpB on a Windows operating system, but keep in mind that you can also install SnmpB MIB browser on Linux, BSD, and Mac operating systems.
Step 2: Send SNMP queries to devices (agents)
Before we can send SNMP queries to devices (agents), we first need to configure SNMP settings for those devices using SnmpB “agent profile” option.
a) Add SNMP-enabled device (agent profile) to SnmpB MIB browser
Let’s create our first “agent profile” that will define SNMP settings for some SNMP enabled devices. In my example, I will add my Linux server that uses SNMP v1 protocol
Click on the “wrench” icon on the main screen:
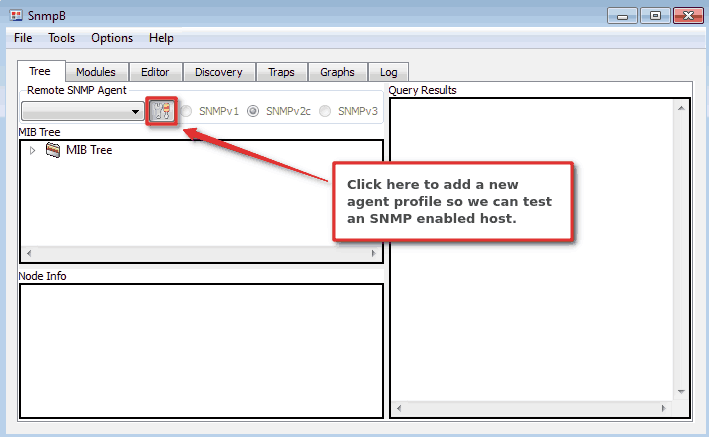
And then right-click on the white part of the screen to add a new agent profile. Define the SNMP settings on the “General Properties” screen just as shown in the image below, but use the SNMP settings for your device (agent).

Here’s an explanation for each parameter:
- Name – hostname of your device (agent), can be anything
- Agent Address/Name – set IP address or DNS name of your device (agent)
- Agent Port – default is UDP port 161, this is rarely changed
- Retries – how many times MIB browser should retry SNMP query before it fails, default is 1
- Timeout (sec) – how long should MIB browser wait for a query to finish, default is 3, but I like to give it a more time
- Supported SNMP version – click on all versions and later you can choose which one you want
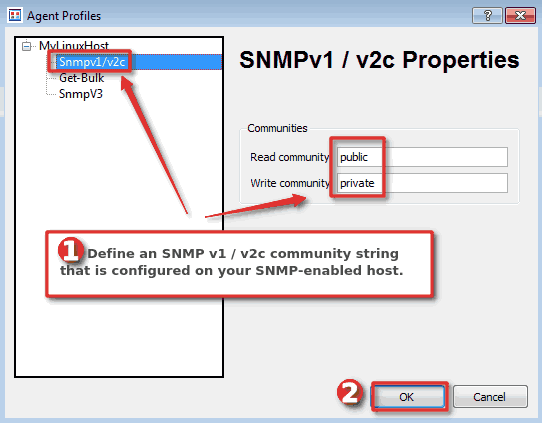
Don’t click OK yet! Now, we need to configure security settings, I will use SNMP v1 / v2c so I will configure “Read commuity” as “public” and “Write community” as “private” (community strings are like passwords).
SNMPv3 configuration needs a little bit of more configuring. Before configuring SNMPv3 on the agent profile, on the main screen go to: “Options” → “Manage SNMPv3 USM Profiles” → right-click on the white part of the screen to create “New USM profile” → Configure “User” and “Security” → Click “OK“. After that, you can return to the “Agent profiles” section and under the SNMPv3 tab configure “SNMPv3 user (USM)” and “SNMPv3 context“.
b) Send SNMP queries (SNMP Walk / SNMP Get / SNMP Set)
In addition to browsing MIBs, SnmpB is also a MIB walker, so you can walk the MIB tree and get every SNMP value from the device (agent). Let’s do just that on our recently added SNMP device/agent!
Choose your device from the dropdown “Remote SNMP agent“, select SNMP version, right-click on the “MIB tree” and select the “Walk” option. Wait for a few seconds and on the right, you should see your query results.
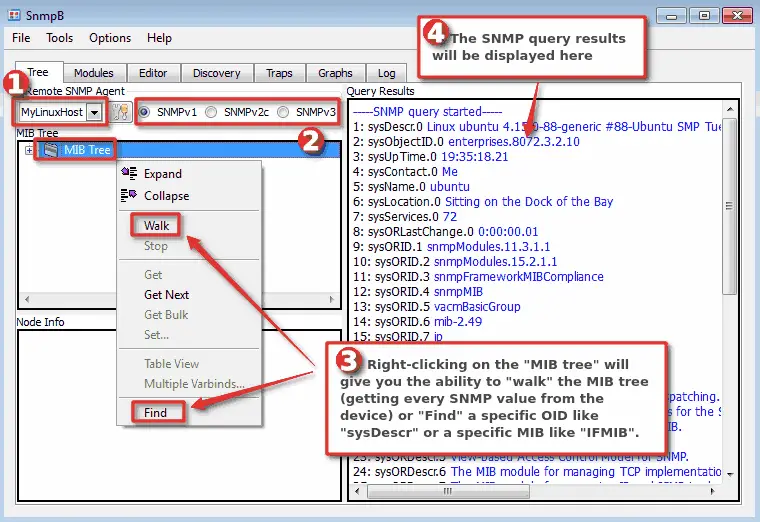
What if you want to find a specific SNMP OID like “sysName”? That’s easy! Just right-click on the “MIB Tree“, then select the “Find” option and enter an OID name just as shown in the image below.
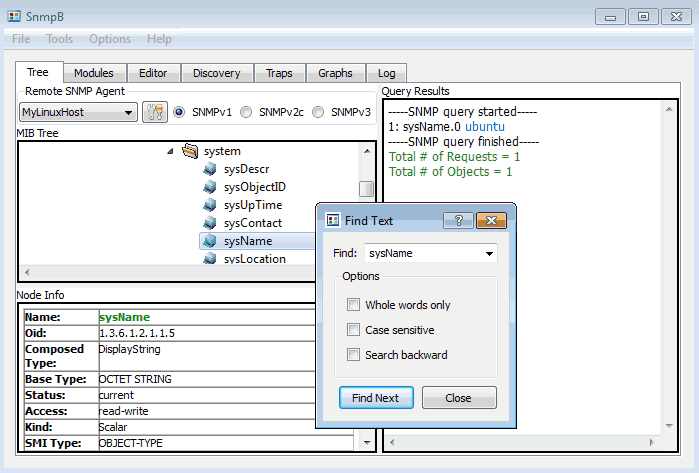
Now you can click on “sysName” and send the SNMP query (Walk or Get) only for that OID. The result of the query will be displayed on the right side. In my case, the “sysName” of my Linux server is “ubuntu“.
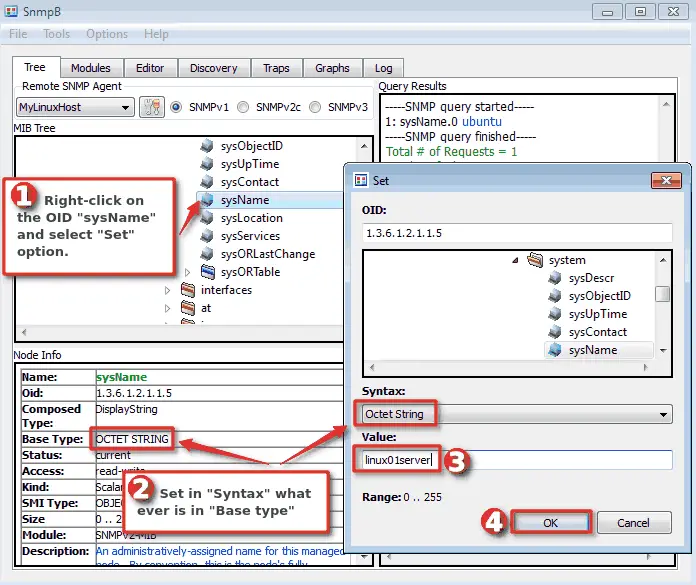
Let’s play a little bit more! What if you wanna set a hostname on the remote SNMP-enabled device to “linux01server” using only SNMP protocol? That is also possible with the “SNMP Set” option, but only if you have configured write permissions on the agent.
To do that, you need to right-click on the OID “sysName”, then select the “Set” option, select “Syntax” and set a new value. Click “OK” when you are done and voilà – hostname is changed.
CONGRATULATIONS!
You have successfully installed SnmpB MIB browser and learned how to send SNMP queries!
CONTINUE TO LEARN MORE:
Manage MIB’s , discover SNMP agents, and receive SNMP traps with SnmpB MIB browser
Step 3: Manage MIB’s on SnmpB MIB Browser
Remember when we were doing a query on the MIB tree to get all the values from the device (agent)? Well, we didn’t get all the values because we didn’t have all the MIB files!
MIB browser will only send SNMP queries from the MIB’s that are available in the local folder and loaded in the application itself. Therefore, we must learn how to add and load a completely new MIB if needed MIB is not available.
a) Loading MIB modules
SnmpB MIB browser has a tab called “Modules” where you can manage the available MIBs. On the left you have “Available MIB Modules“, these are MIBs that exist in the local MIB directory but are not loaded and will not be used. To load a MIB, you need to select the MIB and transfer it from “Available MIB Modules” to “Uploaded MIB Modules”.
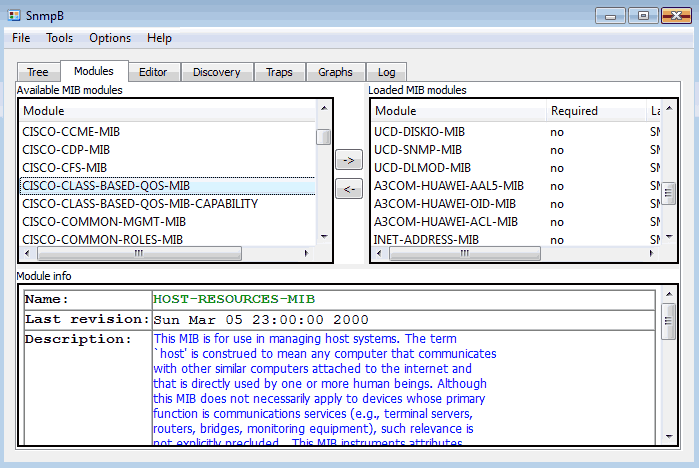
After the transfer, you can use that MIB in the “MIB tree“.
Notice in the image above Cisco MIB called “CISCO-CLASS-BASED-QOS-MIB“. Don’t try to find it because it does not exist in your MIB browser! This is because the MIB browser has a limited number of MIBs. You will need to download from somewhere and copy a MIB file that you need to the default MIB folder. Move on to the next section to learn how to do it.
b) Adding new MIB files
“Available MIB Modules” section will only show MIB files that exist in the folder “C:\Program Files (x86)\SnmpB\mibs” (default path). Therefore, you need to copy your MIB file to that folder and he will appear in “Available MIB modules” section.
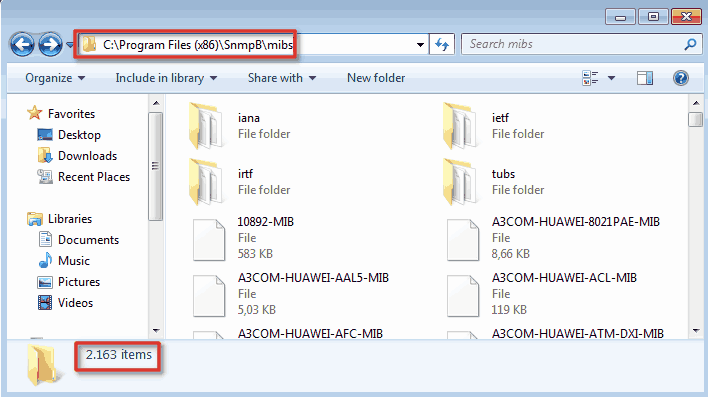
Restart SnmpB after adding a new MIB file. If for some reason your MIB does not appear, try removing the file extension from the MIB file because “.txt” and “.my” are not supported, only “.mib” or no extension at all will work.
I recommend that you download my basic MIB collection – select one by one MIB or download the entire collection in a zip file.
Step 4: Discover SNMP agents with MIB browser
SnmpB has another nice functionality, it can detect SNMP agents on the network. The configuration is quite easy, on the “Discovery” section you need to define the IP network range, select agent profile, SNMP version and click on the discovery button.

Step 5: Receive SNMP traps with MIB browser
I saved the best for last, let’s learn how to receive SNMP traps with SnmpB. You will not believe how many times this functionality has helped me with configuring trap support on a monitoring system.
And it’s pretty easy to use. Just send traps from an agent and check the “Traps” section for arrival.
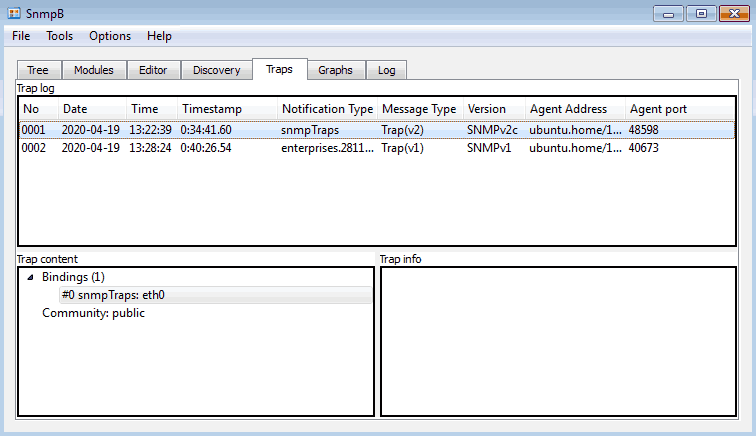
You can use the Net-SNMP tool to send traps from a Linux computer. Here are my Net-SNMP testing commands that I used to create the traps you see in the image above:
# SNMP v1 trap example
snmptrap -v 1 -c public 192.168.5.110 .1.3.6.1.4.1.28116.20 192.168.5.110 6 "" "" 1.3.6.1.4.1.28116.20.1 s "Trap 123 test"

# SNMP v2c trap example
snmptrap -v2c -c public 192.168.5.110 "" "SNMPv2-MIB::snmpTraps" "SNMPv2-MIB::snmpTraps" s "eth0"
Check out my post “Snmpwalk Examples + snmpget, snmpset, snmptrap” if you need more examples on how to send SNMP v1, v2c, and v3 traps.
Thank you for reading.
Great work! Thanks 🙂
Hi, Great Stuff.
I need to know if SNMP polling MIB are different then SNMP Trap OID for same monitoring item/Key ?
If yes then how we can get appropriate details for cisco devices.
Yes, they are, everything is completely different: MIB, Zabbix key and logic behind traps.