
In this tutorial, we will learn step-by-step how to install, optimize and configure Zabbix Proxy 6.0 LTS or 6.4 standard release on RHEL and RHEL based Linux distributions: CentOS 9 or 8 / RHEL 9 or 8 / Oracle Linux 9 or 8 / Alma Linux 9 or 8 / Rocky Linux 9 or 8.
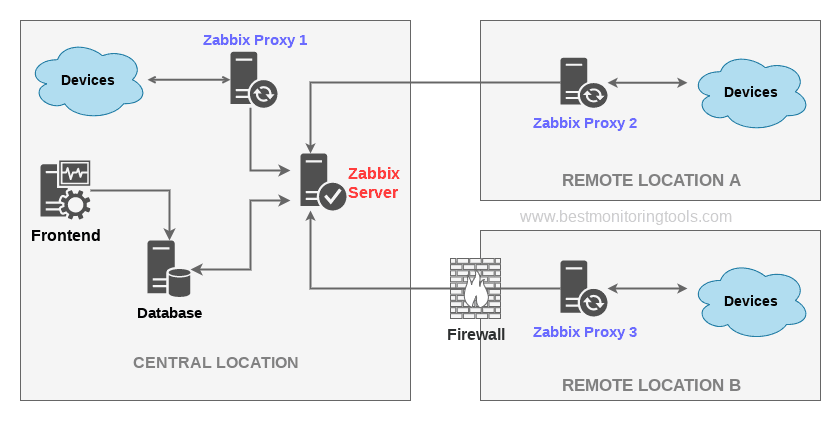
Zabbix proxy is a service that can collect performance and availability data from the end devices on behalf of the Zabbix server.
You can use proxy to monitor remote locations behind the firewall or locations that have unreliable communication and to offload the Zabbix server in large environments.
Enough of talk lets do some work! We will install the latest version of the Zabbix proxy 6 on on CentOS, RHEL, Oracle/Alma/Rocky Linux and make the key optimizations so that your proxy performs better.
Table of Contents
- Step 1: Set SELinux to permissive mode
- Step 2: Configure firewall
- Step 3: Install Zabbix Proxy on CentOS/RHEL
- Step 4: Configure database
- Step 5: Zabbix Proxy configuration
- Step 6: Start and enable Zabbix Proxy service
- Step 7: Register Zabbix Proxy in the Zabbix frontend
- Step 8: Configure hosts in Zabbix to be monitored by a Proxy Server
- Step 7: Configuring PSK encryption on Zabbix proxy (optional)
- Step 8: Optimizing Proxy server (optional)
- Step 9: Optimizing MySQL database (optional)
- Step 10: How to manage Proxy and MySQL service
- Step 11: Understanding Active vs Passive Zabbix Proxy mod
- Step 12: Learn about common Zabbix Proxy errors
Step 1: Set SELinux to permissive mode
This guide is for installing Zabbix Proxy on CentOS/RHEL while guides for installing Zabbix monitoring system (Server) on various Linux distribution can be found on these links: CentOS/RHEL, Ubuntu, Debian, Rasbian (Raspberry Pi).
It is recommended to have SELinux in permissive mode unless you know how to fix its issues:
setenforce 0 && sed -i 's/^SELINUX=.*/SELINUX=permissive/g' /etc/selinux/config
Step 2: Configure firewall
firewall-cmd --add-service={http,https} --permanent
firewall-cmd --add-port={10051/tcp,10050/tcp} --permanent
firewall-cmd --reload
Step 3: Install Zabbix Proxy on CentOS/RHEL
Before you start installing proxy, keep in mind that your Zabbix proxy version must match the server version!
You can check Zabbix server version with the command “zabbix_server -V“:
root@zabbix-server-centos:~$ zabbix_server -V
zabbix_server (Zabbix) 6.0.0
Setup Zabbix 6 .rpm package and install proxy server with MySQL:
Zabbix 6.0 LTS version (supported until February, 2027)
rpm -Uvh https://repo.zabbix.com/zabbix/6.0/rhel/$(rpm -E %{rhel})/x86_64/zabbix-release-6.0-4.el$(rpm -E %{rhel}).noarch.rpm
dnf clean all
dnf -y install zabbix-proxy-mysql zabbix-sql-scripts

                      OR

Zabbix 6.4 standard version (supported until November, 2023)
rpm -Uvh https://repo.zabbix.com/zabbix/6.4/rhel/$(rpm -E %{rhel})/x86_64/zabbix-release-6.4-1.el$(rpm -E %{rhel}).noarch.rpm
dnf clean all
dnf -y install zabbix-proxy-mysql zabbix-sql-scripts
You can find more information about Zabbix’s life cycle and release policies on the official website.
Step 4: Configure database
In this installation, I will use password rootDBpass as root database password and zabbixDBpass as Zabbix database password. Consider changing your password for security reasons.
a. Install and start MariaDB 10.6
curl -LsS -O https://downloads.mariadb.com/MariaDB/mariadb_repo_setup
sudo bash mariadb_repo_setup --mariadb-server-version=10.6
dnf -y install mariadb-server && systemctl start mariadb && systemctl enable mariadb
b. Reset root password for database
Secure MySQL by changing the default password for MySQL root:
mariadb-secure-installation
Enter current password for root (enter for none): Press Enter
Switch to unix_socket authentication [Y/n] y
Change the root password? [Y/n] y
New password: <Enter root DB password>
Re-enter new password: <Repeat root DB password>
Remove anonymous users? [Y/n]: Y
Disallow root login remotely? [Y/n]: Y
Remove test database and access to it? [Y/n]:  Y
Reload privilege tables now? [Y/n]:  Y
c. Create database
sudo mysql -uroot -p'rootDBpass' -e "create database zabbix_proxy character set utf8mb4 collate utf8mb4_bin;"
sudo mysql -uroot -p'rootDBpass' -e "create user 'zabbix'@'localhost' identified by 'zabbixDBpass';"
sudo mysql -uroot -p'rootDBpass' -e "grant all privileges on zabbix_proxy.* to zabbix@localhost identified by 'zabbixDBpass';"
d. Import initial database schema
Import database shema for proxy server (could last up to 5 minutes):
sudo cat /usr/share/zabbix-sql-scripts/mysql/proxy.sql | mysql --default-character-set=utf8mb4 -uzabbix -p'zabbixDBpass' zabbix_proxy
Step 5: Zabbix Proxy configuration
In my setup, I will name proxy as Zabbix proxy 01 and configure it to communicate with the Zabbix that has IP address 10.7.44.235 – please change those accordingly to match your environment.
Open file zabbix_proxy.conf with the command: “sudo nano /etc/zabbix/zabbix_proxy.conf” and add database password and configuration frequency in this format anywhere in the file:
DBPassword=zabbixDBpass
ConfigFrequency=100
“ConfigFrequency” parameter defines how often proxy retrieves configuration data from the Zabbix server in seconds. You can read more about proxy configuration parameters in the official documentation.
Don’t close the file yet! Now, you need to change the current “Server“, “Hostname“, “DBName“, and “DB user” parameter values to something like this:
Server=10.7.44.235
Hostname=Zabbix proxy 01
DBName=zabbix_proxy
DBUser=zabbix
Save and exit file (ctrl+x, followed by y and enter).
Step 6: Start and enable Zabbix Proxy service
Restart proxy service and set it to boot on startup:
sudo systemctl restart zabbix-proxy
sudo systemctl enable zabbix-proxy
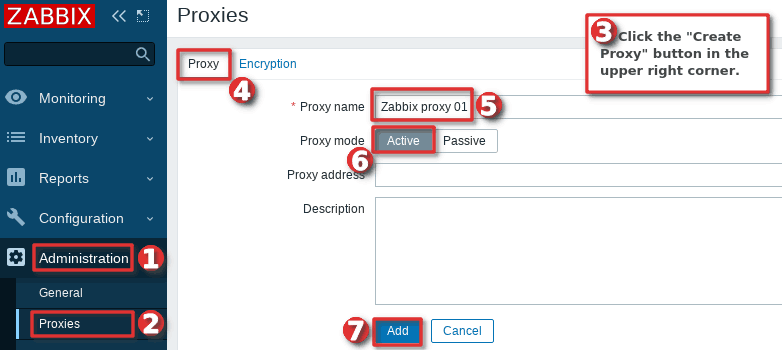
Step 7: Register Zabbix Proxy in the Zabbix frontend
Now that your proxy server is running, you need to register it in the Zabbix frontend using “Proxies” option under the “Administration” section. Click on the “Create proxy” button on the right, then set “Proxy name” to Zabbix proxy 01 and “Proxy mode” to “Active“.
Note that for a proxy to work in active mode “Proxy name” must be the same as the “hostname” parameter in “zabbix_proxy.conf” file.
Picture showing how to register an active Proxy in Zabbix frontend
Immediately after adding a proxy to the frontend, you will be informed that the proxy has never been seen.

However, if you wait for 100 seconds “Last seen (age)” status will display seconds instead “Never” which means that proxy is communicating with the server.

Why 100 seconds? Remember what we have put under the “ConfigFrequency” parameter in “zabbix_proxy.conf” file? Whatever you put there that’s how long will it take for proxy to contact the Zabbix server to retrieve configuration data. This rule only applies if the proxy is in active mode.
Note that “Last seen (age)” status should never go above 6 seconds if proxy-server communication is working.
Active proxy mod is recommended because it can work behind a firewall but you can check out the section “Understanding Active vs Passive Zabbix Proxy mod” If you need to set proxy to work in a passive mode.
Step 8: Configure hosts in Zabbix to be monitored by a Proxy Server
Proxy is running and communicating with the Zabbix server, but it is not gathering any data because we didn’t do the last crucial step! We need to configure hosts in Zabbix to be monitored by the proxy server.
Let’s do that together, go to the “Host” option under the “Configuration” section and select hosts that need to monitored by proxy.
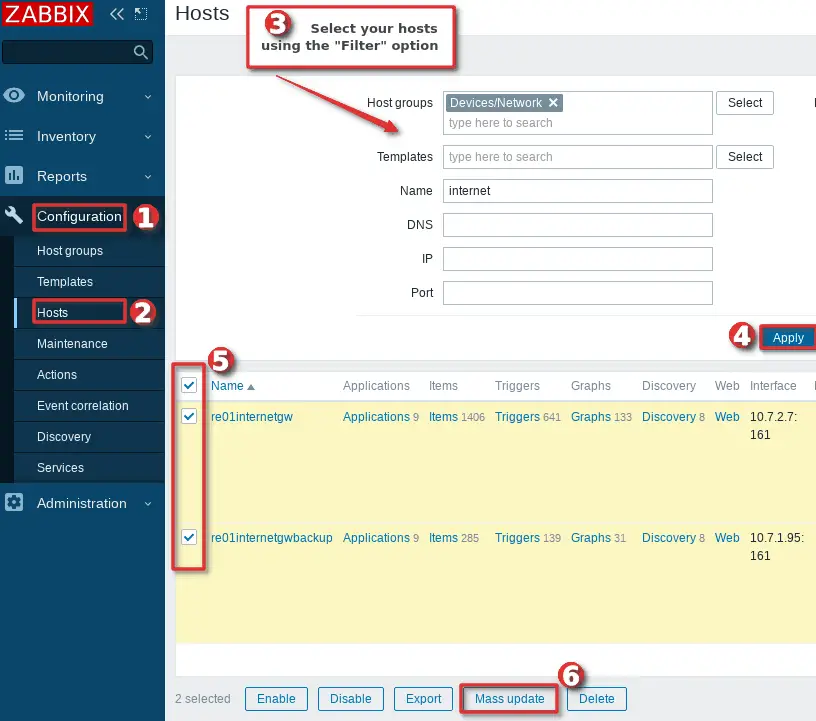
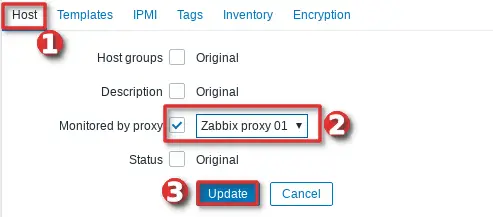
After you have select hosts click on the “Mass update” button, then under the “Host” options select our newly added proxy in the “Monitored by proxy” dropdown and finally click the “Update” button just as shown in the image below.
Configure hosts in Zabbix to be monitored by a proxy server – Step 2
CONGRATULATIONS!
You have successfully installed and configured Zabbix Proxy 6 on CentOS/RHEL!
No need to change anything else as other steps are optional.
CONTINUE TO LEARN MORE:
Configuring encryption (PSK) on proxy server
Optimizing proxy server and MySQL database
How to manage Proxy and MySQL service
Understanding Active vs Passive Proxy mod
Learn about common Proxy errors
Step 7: Configuring PSK encryption on Zabbix proxy (optional)
Zabbix supports encrypted communications between Zabbix server and proxy using Transport Layer Security (TLS) protocol v.1.2. You can use certificate-based and pre-shared key-based encryption (PSK), but in this tutorial we will configure the latter.
a. Generate PSK key on proxy server
Generate 256-bit (32 bytes) PSK key with openssl command:
$ openssl rand -hex 32
 382eb0250c365cc207cc4980cdb1bb1814c19d882b7fddcda00281311a8fb955
Create and open file “zabbix_proxy.psk” with command “sudo nano /etc/zabbix/zabbix_proxy.psk” and copy & paste that newly generated key into it.
Save and exit the file (ctrl+x, followed by y and enter) and set the correct file permission:
sudo chown zabbix:zabbix /etc/zabbix/zabbix_proxy.psk
sudo chmod 644 /etc/zabbix/zabbix_proxy.psk
b. Configure Zabbix proxy to support PSK encryption
Open zabbix_proxy.conf file with command: “sudo nano /etc/zabbix/zabbix_proxy.conf” and add this configuration anywhere in file:
TLSConnect=psk
TLSAccept=psk
TLSPSKFile=/etc/zabbix/zabbix_proxy.psk
TLSPSKIdentity=ZBX-PSK-01
Save and exit file (ctrl+x, followed by y and enter). Keep in mind that “TLSPSKIdentity” can be anything, so for security reasons set something else – don’t use mine!
Don’t forget to restart proxy server after changing the configuration file:
sudo systemctl restart zabbix-proxy
c. Enable PSK encryption on the proxy in Zabbix frontend
Communication between Zabbix proxy and server is not yet encrypted because we have enabled PSK encryption on the proxy side but not on the server-side.
We need to enable encryption on the server side so go to web frontend and select your proxy on the “Proxies” option under the “Administration” section. Next, on the “Encryption” tab set PSK under “Connections from proxy” option and copy and paste “PSK identity” and “PSK” (key) that you have configured on the proxy. If you ever lose your generated PSK key check it with command “cat /etc/zabbix/zabbix_proxy.psk” on the proxy server.
When you are done with configuration click the “Update” button just as shown in the image below.

If you have done everything right you should see something like this:

Step 8: Optimizing Proxy server (optional)
Don’t bother with this optimization if you are monitoring a small number of devices, but if you are planning to monitor a large number of devices then continue with this step.
Open zabbix_proxy.conf file with command: “sudo nano /etc/zabbix/zabbix_proxy.conf” and add this configuration anywhere in file:
StartPollers=100
StartPollersUnreachable=50
StartPingers=50
StartTrappers=10
StartDiscoverers=15
StartHTTPPollers=5
CacheSize=128M
HistoryCacheSize=64M
HistoryIndexCacheSize=32M
Save and exit file (ctrl+x, followed by y and enter).
This is not a perfect configuration, keep in mind that you can optimize it even more. Let’s say if you don’t use ICMP checks then set the “StartPingers” parameter to 1 or if you don’t use active agents then set “StartTrappers” to 1 and so on. You can find out more about the parameters supported in a proxy configuration file in the official documentation.
If you try to start the proxy server you will receive an error “[Z3001] connection to database 'zabbix_proxy' failed: [1040] Too many connections” in the log “/var/log/zabbix/zabbix_proxy.log” because we are using more proxy processes than MySQL can handle. We need to increase the maximum permitted number of simultaneous client connections and optimize MySQL – so move to the next step.
Step 9: Optimizing MySQL database (optional)
a. Create custom MySQL configuration file
Create file “10_my_tweaks.cnf" with “sudo nano /etc/my.cnf.d/10_my_tweaks.cnf” and paste this configuration:
[mysqld]
max_connections                = 280
innodb_buffer_pool_size        = 1G

innodb-log-file-size           = 128M
innodb-log-buffer-size         = 128M
innodb-file-per-table          = 1
innodb_buffer_pool_instances   = 8
innodb_old_blocks_time         = 1000
innodb_stats_on_metadata       = off
innodb-flush-method            = O_DIRECT
innodb-log-files-in-group      = 2
innodb-flush-log-at-trx-commit = 2

tmp-table-size                 = 96M
max-heap-table-size            = 96M
open_files_limit               = 65535
max_connect_errors             = 1000000
connect_timeout                = 60
wait_timeout                   = 28800
Save and exit the file (ctrl+x, followed by y and enter) and set the correct file permission:
sudo chown mysql:mysql /etc/my.cnf.d/10_my_tweaks.cnf
sudo chmod 644 /etc/my.cnf.d/10_my_tweaks.cnf
Two things to remember!
Configuration parameter max_connections must be larger than the total number of all proxy processes plus 50. You can use the command below to automatically check the number of Zabbix processes and add 50 to that number:
root@centos:~ $  egrep "^Start.+=[0-9]"  /etc/zabbix/zabbix_proxy.conf  |  awk -F "=" '{s+=$2} END {print s+50}'
 280
The second most important parameter is innodb_buffer_pool_size, which determines how much memory can MySQL get for caching InnoDB tables and index data. You should set that parameter to 70% of system memory if only database is installed on server.
However, in this case, we are sharing a server with the proxy so you should set innodb_buffer_pool_size to 50% of total system memory. That would be 1G because my CentOS server has 2G RAM.
I didn’t have any problems with memory, but if your proxy server crashes because of lack of memory, reduce “innodb_buffer_pool_size” and restart MySQL server.
Learn more about database optimization in the tutorial: How to optimize Zabbix database?
b. Restart Proxy server and MySQL service
Stop and start the services in the same order as below:
sudo systemctl stop zabbix-proxy
sudo systemctl stop mysql
sudo systemctl start mysql
sudo systemctl start zabbix-proxy
Step 10: How to manage Proxy and MySQL service
Sometimes you will need to check or restart Zabbix proxy or MySQL service – use commands below to do that.
Proxy Server
sudo systemctl <status/restart/start/stop> zabbix-proxy

MySQL Server
sudo systemctl <status/restart/start/stop> mysql
Step 11: Understanding Active vs Passive Zabbix Proxy mod
When you use a proxy in active mode, it will connect to the Zabbix server to retrieve configuration and send data. This is a great feature that enables active proxy server to work behind a firewall.
And if you use a proxy in passive mode Zabbix server will initiate a connection to the proxy to send configuration and retrieve data from the proxy.

Before, in this tutorial, we have configured proxy server to work in active mode. Let me show you how can you configure the proxy to work in passive mode.
Open file zabbix_proxy.conf with the command: “sudo nano /etc/zabbix/zabbix_proxy.conf” and turn on passive mode and define Zabbix server IP address by adding this anywhere in the file (change “Server” parameter to to match your Zabbix server):
ProxyMode=1
Server=10.7.44.235
Save and exit the file (ctrl+x, followed by y and enter). Reboot proxy server with the command “sudo systemctl restart zabbix-proxy“
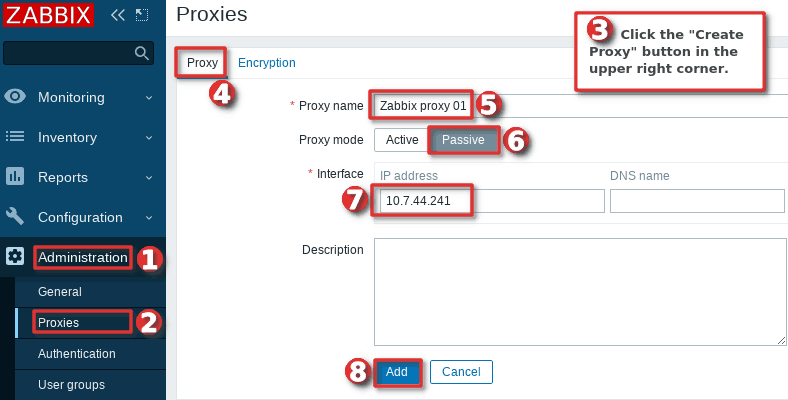
Now, you need to add the proxy in the Zabbix frontend using the “Proxies” option under the “Administration” section. Click on the “Create proxy” button on the right, then set “Proxy name” to anything you want and “Proxy mode” to “Passive“. Define IP address of the proxy server under the “Interfaces” and click add button if you are done with the configuration.
Step 12: Learn about common Zabbix Proxy errors
No data in items because Zabbix proxy time differs from Zabbix server time
Starting from version 4.0 Zabbix server will no longer adjust value timestamps in cases when proxy time differs from Zabbix server time. This problem is easy to detect because server-proxy communication will work but there will be no data in the items.
Adjust Zabbix server and the proxy to use the same time server (NTP) or set the time manually.
Communication between Proxy and Server is not working
Zabbix proxy is using port 10051 to communicate with the Zabbix server so make sure that you permit traffic coming from port 10051 in your network.
Note that Zabbix is using compression for communication with Proxies. Compression improves performance because it drastically reduces network traffic.
However, this may cause some problems in environments that have security devices (IDS/IPS or NGFW) installed as they can drop network packets if they detect compression in the network stream. To avoid that problem, make sure the application definitions on the security devices are up-to-date, and if you have any problems, contact your device vendor.
Checking logs on the Proxy server
If you experience a problem with the proxy you can check last 500 lines of the log with the command:
tail -500 /var/log/zabbix/zabbix_proxy.log
Thank you for reading.
Hi,
Step 4: Configure database, d. Import initial database schema,
You try to import the schema into the database ‘zabbix’. Should be ‘zabbix_proxy’.
Thx for the info! Updated!
I am trying to connect to my Zabbix Server and im receiving the message
Unable to connect to the server [zabbix server]:10052 [cannot connect to [[zabbix server]:10052]: [61] Connection refused]
Firewall problems?
Nice post! Thanks a lot!