You installed Zabbix and configured it to monitor your Linux and Windows servers, routers, and switches, and a bunch of other systems. Now it would be a good idea to get some email notifications from Zabbix if problems occur on those systems. In this tutorial, we will set up a Zabbix alerts so that any problem is forwarded to administrators via email.
Configuration of Zabbix email alerts is quite simple, you can configure it in a few minutes following steps from 1 to 4.
However, consider reading the full tutorial if you like to learn about advance notifications and escalations, changing email content, delaying email alerts, optimize Zabbix mail notifications in a large environment, common email notification errors, and more.
This guide describes how to integrate Zabbix with a Gmail, Office 365, and an internal email server (SMTP), but keep in mind that you can use any SMTP server with minor configuration changes.
Table of Contents
- Step 1: Configure Email Media Type on Zabbix
- Step 2: Test Zabbix Email Notifications via frontend
- Step 3: Provide an email address for configured users in Zabbix
- Step 4: Enable trigger action that will send Zabbix alerts to users via email
- Step 5: Configure advance mail notifications and escalations
- Step 6: Learn about common Zabbix mail notifications errors
- a) How to fix “Zabbix alerter processes more than 75% busy” problem
- b) How to fix “Zabbix escalator processes more than 75% busy” problem
- c) Optimize Zabbix alerts in large environments (increase concurrent sessions)
- d) Email communication is blocked (firewall/network problems)
- e) Cleaning Zabbix alerts and escalations from the database (stopping email alerts)
Step 1: Configure Email Media Type on Zabbix
We must first tell the Zabbix which mail server to use for notifications by configuring existing media type called “Email“. Choose from three options: Gmail, Office 365, and Internal mail server integration.
Option 1: Send Zabbix email notifications via Gmail
Gmail is free and available to everyone, so I guess that this option will be used most of the time. Plus, with Gmail, you get lots of space (15GB) just for storing Zabbix alerts that you can search and view in the Gmail “Sent” folder.
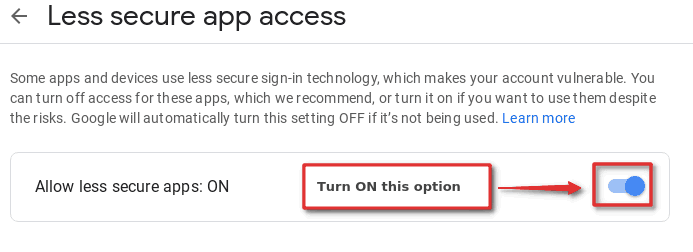
Make sure that email server smtp.gmail.com is reachable via TCP port 587 from the Zabbix server (check the firewall). Also, you need to enable the “Allow less secure apps” option. Log in through your browser with a Gmail account and go to the https://myaccount.google.com/lesssecureapps and click on the “Allow less secure apps” button.
Now that we have “Allow less secure apps” option enabled, let’s configure Zabbix to send emails using your Gmail account.
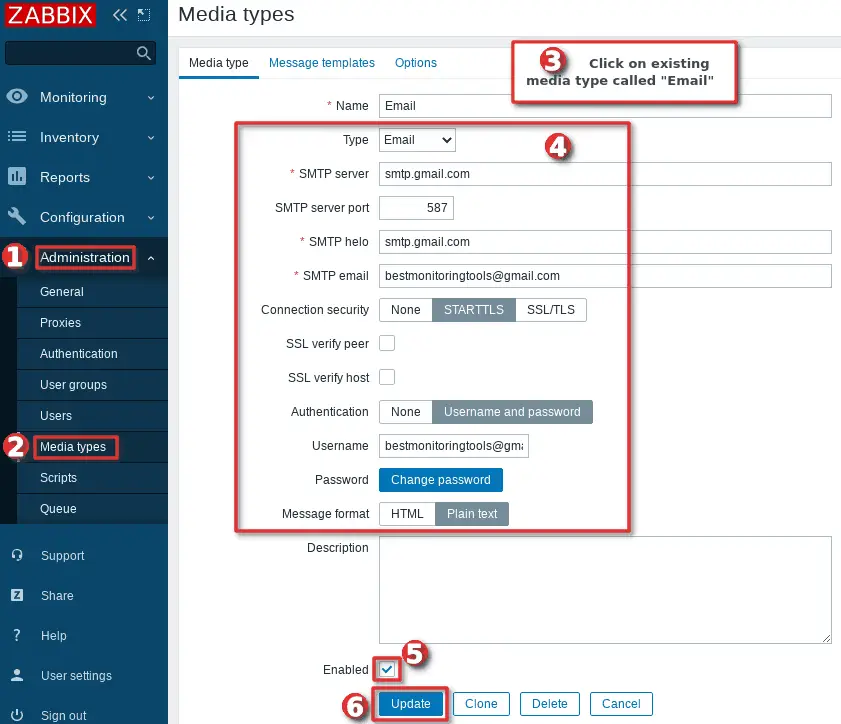
Follow the quick guide in the image above or use the detailed steps below to configure Zabbix media type to send alerts via email through your Gmail account:
- Use the default media type called “Email” that comes with Zabbix (or create a new one) under the section “Administration“→”Media types“
- Set “SMTP server” to smtp.gmail.com to handle outgoing emails
- Set “SMTP server port” to port 587
- Set “SMTP hello” to smtp.gmail.com
- Set your Google email in the “SMTP email” field that Zabbix will use as the “From address” in the outgoing emails (i.e. zabbix_mycompany@gmail.com). You can also force a display name if you put an email address in the format “Zabbix_Info <zabbix_mycompany@gmail.com>” (without quotes).
- Select “STARTTLS” option under the “Connection security” section
- Select “Username and password” under the “Authentication” section
- Set your Google email as “Username”
- Set your Google account password in the “Password” section
- Select “Message format“, use “HTML” or “Plain text” (default)
- Enable this “Media type” by clicking “Enabled” option
- Hit the “Update” button
Option 2: Send Zabbix email notifications via Office 365
More and more companies are using Office 365 to send Zabbix mail notifications. The configuration is pretty simple, just make sure that email server smtp.office365.com is reachable by the Zabbix server via TCP port 587 (check the firewall).

Follow the quick guide in the image above or use the detailed steps below to configure Zabbix media type to send alerts via email through your Office 365 mail account:
- Use the default media type called “Email” that comes with Zabbix (or create a new one) under the section “Administration” → “Media types“
- Set “SMTP server” to smtp.office365.com to handle outgoing emails
- Set “SMTP server port” to port 587
- Set “SMTP hello” to smtp.office365.com
- Set your Office 365 email in the “SMTP email” field that Zabbix will use as the “From address” in the outgoing emails (i.e. zabbix_mycompany@mycompany.com). You can also force a display name if you put an email address in the format “Zabbix_Info <zabbix_mycompany@mycompany>” (without quotes).
- Select “STARTTLS” option under the “Connection security” section
- Select “Username and password” under the “Authentication” section
- Set your Office 365 account email as “Username“, but make sure that you put here the main email that you use to login to Office 365 or you will receive “Login denied” error. Your login Office 365 username and email are usually identical, but sometimes, like in my example, they may be different.
- Set your Office 365 account password in the “Password” section
- Select “Message format“, use “HTML” or “Plain text” (default)
- Enable this “Media type” by clicking “Enabled” option
- Hit the “Update” button
Option 3: Send Zabbix email notifications via internal mail server
This option is used mostly in companies that have installed an internal mail server (i.e. Microsoft Exchange Server). Make sure that TCP port 25 is open on the firewall and that the mail relay option is enabled on your mail server.
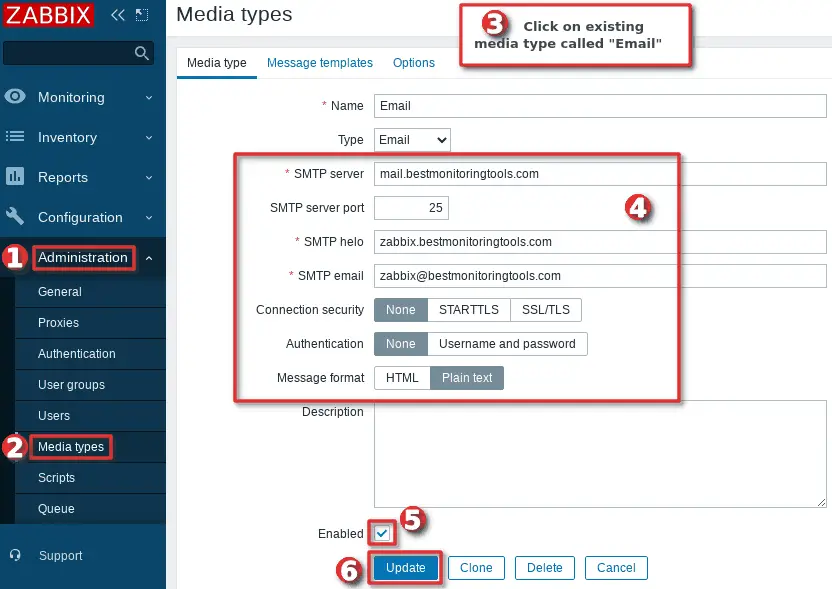
Follow the quick guide in the image above or use the detailed steps below to configure Zabbix media type to send alerts via email through your local email server:
- Use the default media type called “Email” that comes with Zabbix (or create a new one) under the section “Administration“→”Media types“
- Set “SMTP server” IP address or DNS that will handle outgoing emails
- Set “SMTP server port“, usually that’s TCP port 25
- Set “SMTP hello“, by default that would be a domain name
- Set “SMTP email” that will be used as the “From address” in the outgoing emails that are sent by Zabbix (i.e. zabbix@mycompany.com). You can also force a display name if you put an email address in the format “Zabbix_Info <zabbix@mycompany.com>” (without quotes).
- Select the level of “Connection security“, I will use “None” however you can select “STARTTLS” or “SSL/TLS” if your SMTP server is configured for secure communication.
- Select “Authentication”, I will use “None” however you can select “Username and password” if your SMTP server is configured for authentication.
- Select “Message format“, use “HTML” or “Plain text” (default)
- Enable this “Media type” by clicking “Enabled” option
- Hit the “Update” button
Step 2: Test Zabbix Email Notifications via frontend
Before we proceed with our Zabbix email notifications setup, we need to make sure that our configuration from previous step works as intended. Test your configuration using the “Test” option for a media type that you have just configured under the section “Administration” → “Media types“.
Click on the “Test” option in the last column of the row where is your media type located and a new window will appear. In the “Send to” field, enter the email to which Zabbix will send alerts and click the “Test” button.
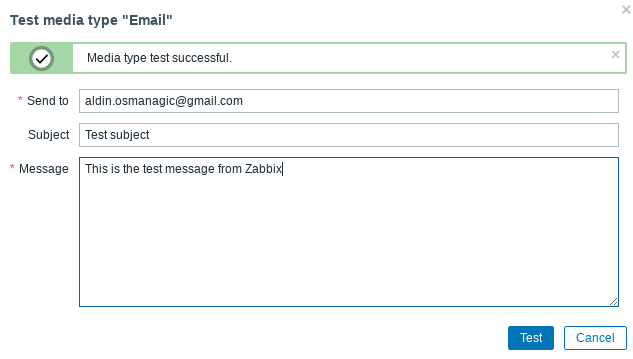
You can move to the next step if you receive “Media type test successful“ otherwise check the firewall and try to google error message that is produced by the test tool.
Step 3: Provide an email address for configured users in Zabbix
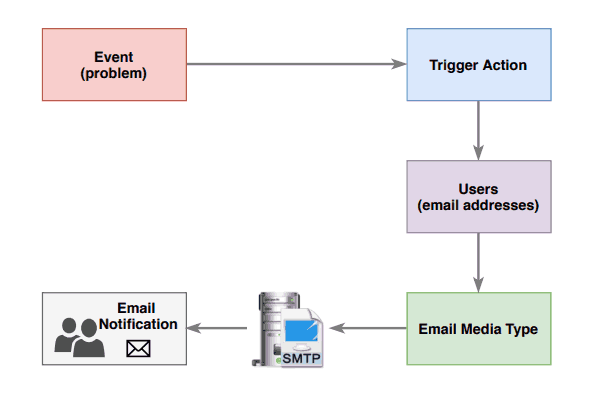
Well done! The tricky part is over. Now we will define which users, that are configured in Zabbix, will receive Zabbix alerts via email.
However, we can’t do that unless those users have an email address configured because Zabbix does not send alerts directly to email addresses. Instead, alerts are sent to the configured users in Zabbix. And we must make sure that those users have a valid media type and an email address configured.
Therefore, select users that are going to receive email notifications from Zabbix and configure an email address on them.
In my example, I will use default administrator user “Admin” but if you wish you can create a new user.
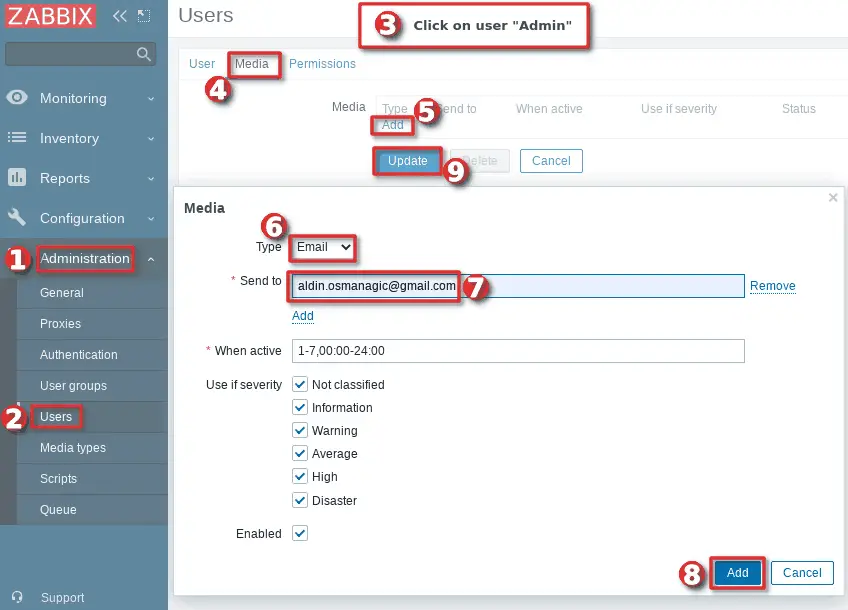
Follow the short instruction from the image above or use the detailed steps below to configure media type and mail address on the Zabbix user:
- Click on the user under the section “Administration“→”Users“
- Select tab “Media“
- Under the “Media” section click the little “Add” button and a new window will appear
- Select “Email” from the “Type” dropdown menu
- Define email address that will receive Zabbix alerts in the “Sent to” field (you can add multiple email addresses)
- Define working hours in the “When active” field or leave as is if you want to receive alerts anytime
- Define which alarm severities will Zabbix forward to users or leave as is if you want to receive all severitys
- Click on the “Enabled” option
- Click on the “Add” button
- Hit the “Update” button
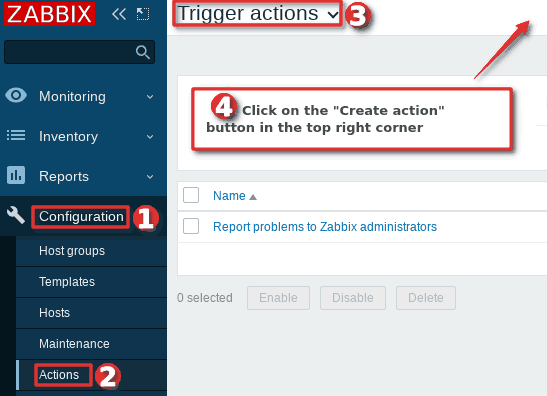
Step 4: Enable trigger action that will send Zabbix alerts to users via email
With the “Trigger actions” tool we can tell Zabbix what to do when an event is generated (i.e. run a script, open a ticket, send an email notification …). In our case, we want to send a mail notification when a problem appears in Zabbix.
If you used Zabbix default administrator user “Admin” to define an email address, just like I did in the previous step, then your job is almost over. Enable preconfigured trigger action called “Report problems to Zabbix administrators” under the section “Configuration“→”Actions”→”Trigger actions” and you are done!

That trigger action will forward events (problems) as an email notification to the users in the user group “Zabbix administrators“. By default, the “Admin” user is the only member of that group, but you can add more users.
However, what if you like to forward email notification to another user? Maybe you want to delay email notification, or you need to ignore alarms that are coming from the testing environment, or you need to forward specific alarms to one email address? In that case, it is a better idea to create a new trigger action from scratch using Step 5: Configure advance mail notifications and escalations.
CONGRATULATIONS!
You have successfully configured email notifications on Zabbix!
No need to change anything else as other steps are optional.
CONTINUE TO LEARN MORE:
Configure advance mail notifications and escalations
Learn about common Zabbix mail notifications errors
Step 5: Configure advance mail notifications and escalations
I have only written about notifications in this tutorial, and now it’s time to mention escalations. Zabbix provides flexible rules for building escalations. Depending on the setup, Zabbix can automatically escalate (go to the next escalation step) unresolved issues and perform the actions assigned to each escalation step.

Let’s dive deep into the trigger actions and learn how to create advance mail notifications and escalations.
a) Create a basic trigger action that will send mail notifications
Trigger actions enable us to create mail notifications and escalations, so first things first, let’s create a basic trigger action just like the one that comes preconfigured with Zabbix (disable preconfigured trigger if you are not going to use it).
Click on the “Create action” button in the top right corner under the section “Configuration“→”Actions” just like in the image below.
Under the “Action” tab enter trigger action name in the “Name” field and click on the “Enabled” option. Leave “Conditions” as is, but don’t worry we will return to that later.
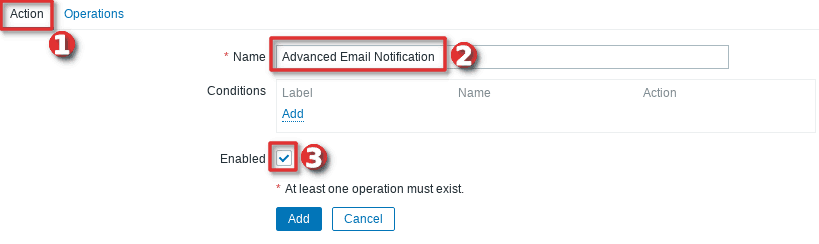
Under the “Operations” tab click the little “Add” button in the “Operations” section, a new window will appear. Click on the “Add” button under the “Send to User groups” and select user groups that should receive mail notifications. Note that you can send notifications directly to users using the “Send to Users” option. When you are done with adding users or user groups click on the “Add” button.
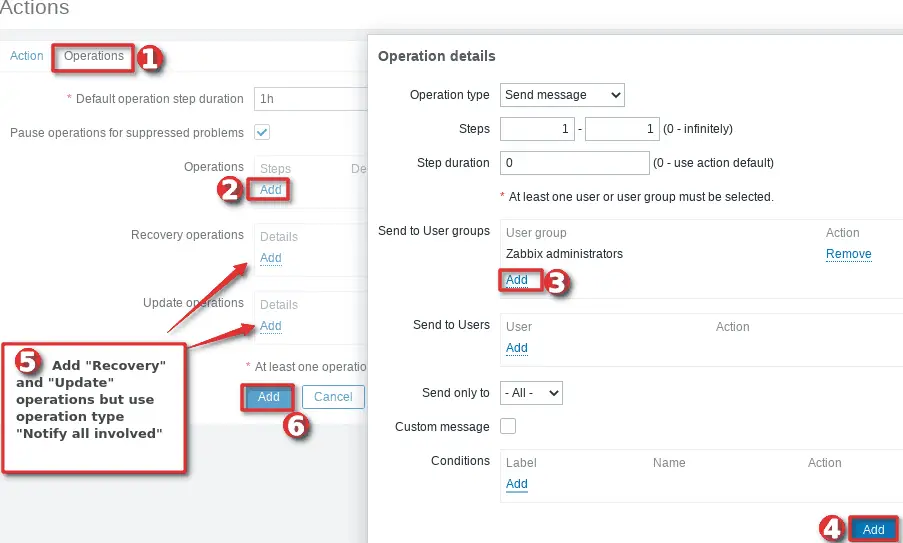
Now you need to set “Notify all involved” as operation type in the “Recovery Operations” and “Update Operations” section. “Recovery Operations” will notify users when an alarm is cleared, and “Update Operations” will notify users when an alarm is updated (comment, acknowledge, etc.).
Note that “Update” and “Recovery” notifications are optional, you do not need to configure them if you don’t want to receive such notifications.
When you have finished configuring, click that big “Add” button at the bottom.
b) How to configure condition based notifications
That basic trigger action that we created in the previous step will send an email notification for each alarm in Zabbix. But what if we want to send notifications to users only if the alarm comes from the production environment or just from specific systems?
Let’s play around. I will update the current trigger actions to send an email notification only in case:
- Alarm has severity “Average“, “High” or “Disaster“
- Alarm is coming from the host that is part of the “Devices/Production” host group. I don’t want to receive alarms from the test environment.
- Alarm is coming from the host that is part of the “Devices/Server” or “Devices/Network” host group. This rule will make sure that I receive only alarms from the server and network devices.
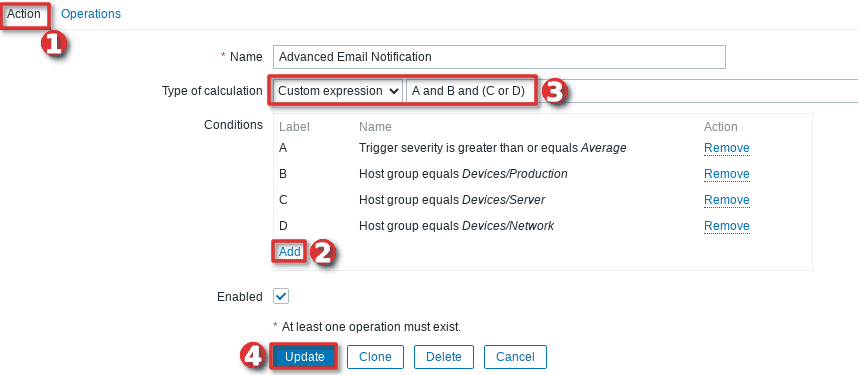
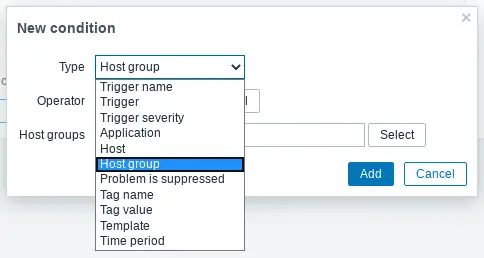
As you can see in the picture above, the configuration is quite simple. Under the “Action” tab click on the “Add” button to add conditions, but be careful when entering “AND” and “OR” operators in “Type of calculations – Custom expression” field.
This is just one example and is pretty simple. Zabbix offers a bunch of options that allow you to customize email notifications to your own needs.
Before I move to another example, I would like to emphasize something important. Zabbix supports event tags that can drastically expand Zabbix’s capabilities. Tags are a whole other topic, so I’ll be brief.
With tags, you can do a smart alarm correlation and each alarm can be enriched with useful information like geographical location, is it production or test environment, what services are impacted, who maintains the system, etc.

Why am I telling you this? Because you can use tags in the trigger actions with condition type “Tag name” and “Tag value” and optimize notifications to perfection!
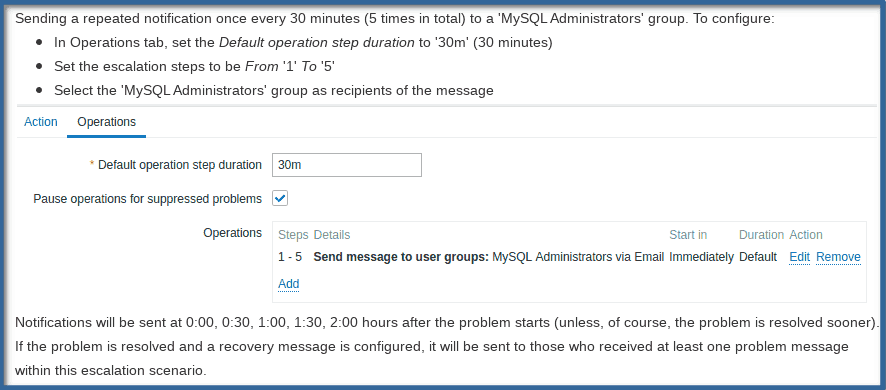
c) Configuring delayed mail notifications on Zabbix
There are many reasons for using delayed notifications. I always recommend using it in the Zabbix setup where trigger dependencies are used to suppress redundant alarms. Because, without delay notification, in the event of a major network failure there is a chance that you will still get spammed with alarms before the dependency mechanism kick in.
Let’s configure our existing trigger action so that Zabbix alerts are sent 5 minutes after the problem (event) is generated.
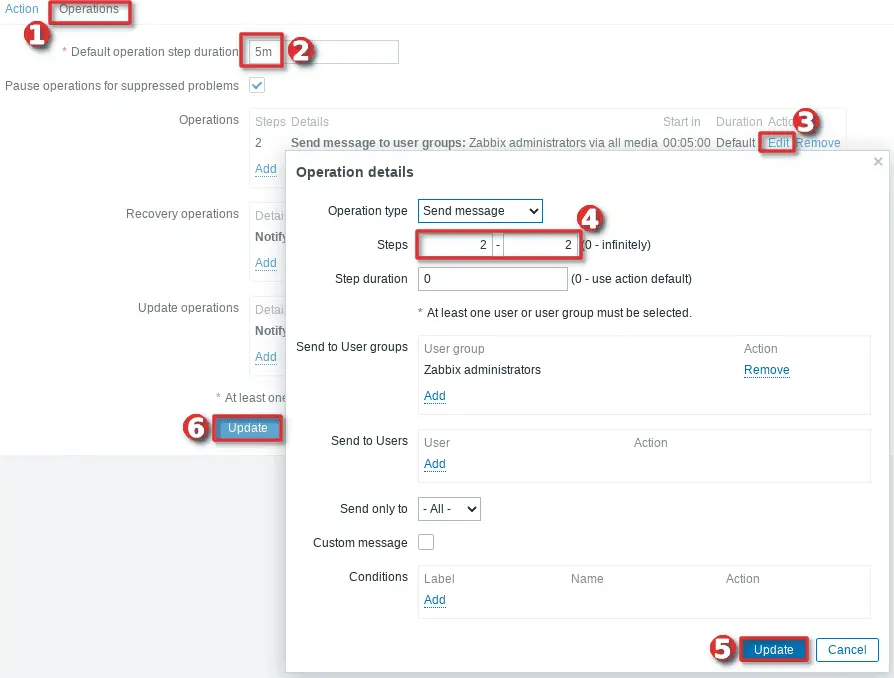
Under the section “Configuration“→”Actions“→”Trigger Actions” click on the existing trigger action that we created earlier. Go to the “Operations” tab and set “Default operation step duration” to 5 minutes and “Steps” to “2 – 2”. Hit the update buttons to save the new configuration.
Keep in mind that you will not receive mail notification if the alarm is triggered and cleared under the 5 minutes.
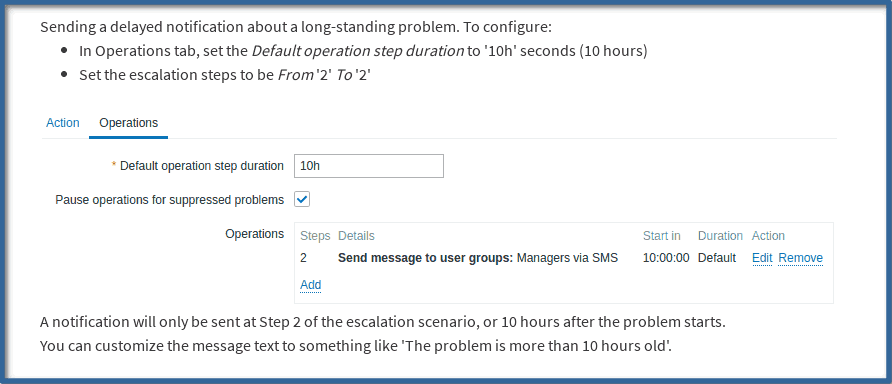
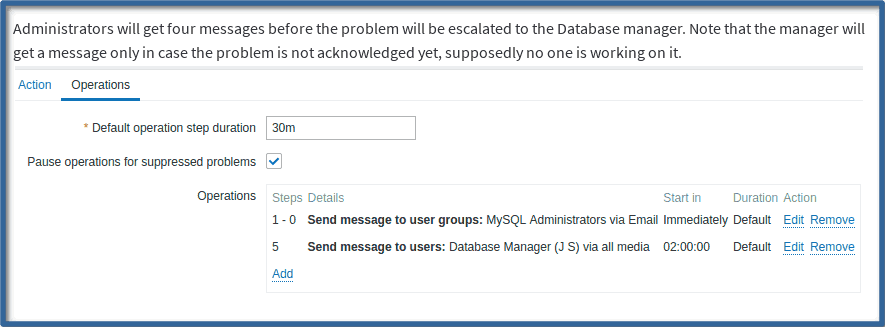
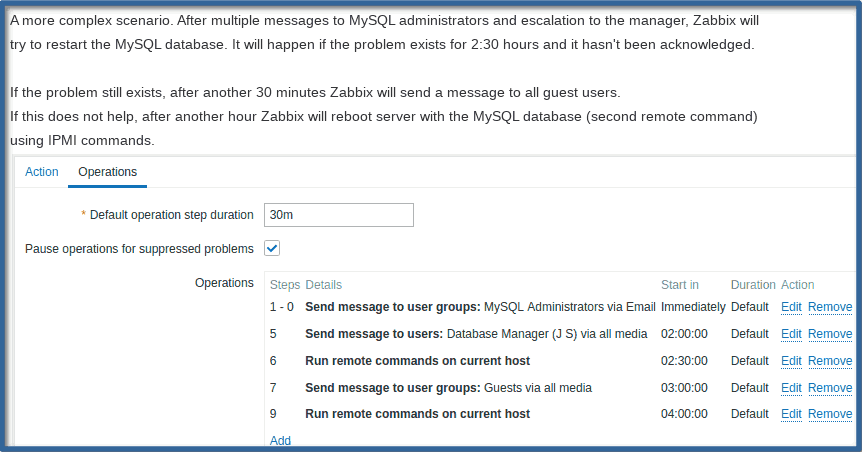
d) Escalate unacknowledge problems in Zabbix
Now that you know how delayed and condition-based notification works, let’s create a simple escalation procedure. We will add an additional step that will check active problems that are not resolved or acknowledged after 24h and notify the boss about that.
Note that I m still using the same trigger action from before. Select the operations tab, edit the current step 2, and set 24h in the “Step Duration” field.
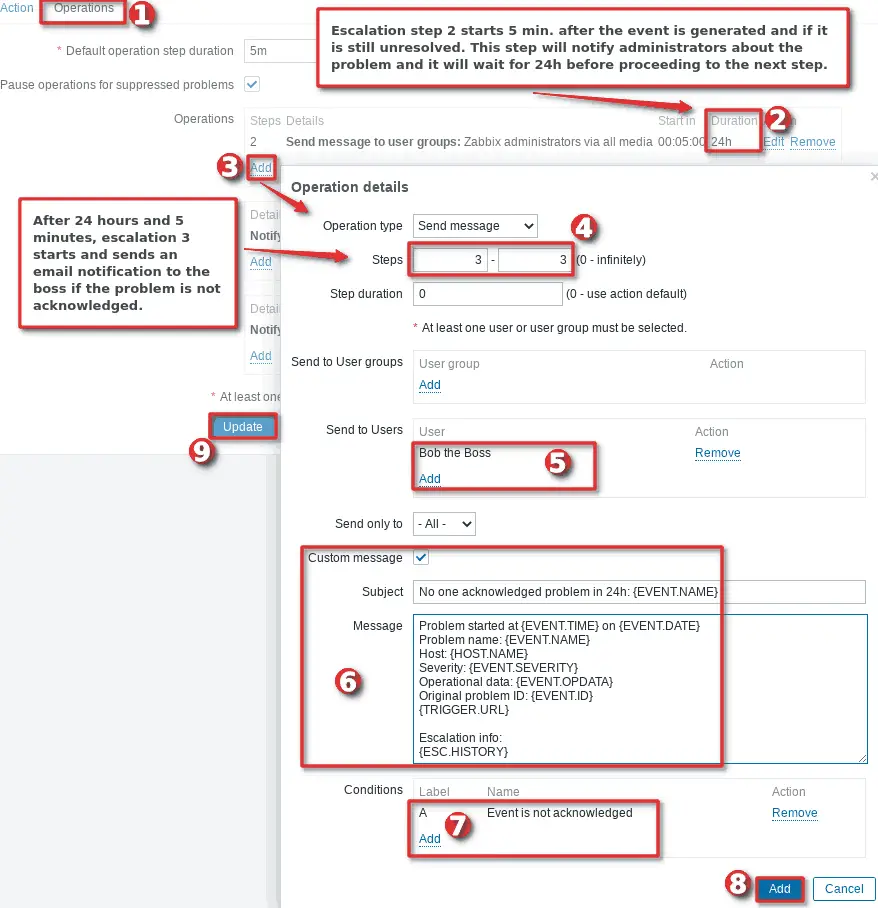
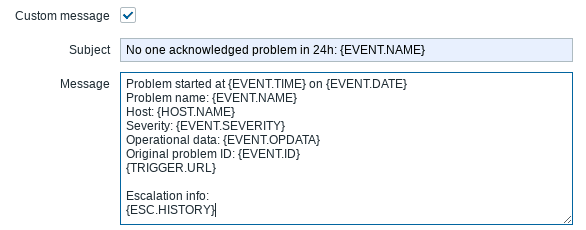
Then click the “Add” button under the “Operations” section and add a new step. A new window will open. Set “3-3” in the “Steps” field, add a user or user group that will receive escalations. Click on the “Custom message” and add this as the subject:
No one acknowledged problem in 24h: {EVENT.NAME}
And this as the message:
Problem started at {EVENT.TIME} on {EVENT.DATE}
Problem name: {EVENT.NAME}
Host: {HOST.NAME}
Severity: {EVENT.SEVERITY}
Operational data: {EVENT.OPDATA}
Original problem ID: {EVENT.ID}
{TRIGGER.URL}

Escalation info:
{ESC.HISTORY}
After that, make sure that you add a condition that will process events that are not acknowledged. Click on the “Add” button and then on the “Update” button and you are done!
Notice how I added the {ESC.HISTORY} macro to the message? That macro is important for escalations because it includes a complete escalation history. Check supported macros by location to find out all the available macros that you can use in Zabbix notifications.
e) Escalations examples
You can find a few more examples of advanced escalations on the official Zabbix website. However, for your convenience, I will paste them here.
f) Change email content (message templates)
You can change the content of the mail messages in two different ways:
- Update message templates on the media type. To configure it go to “Administration” → “Media types” → Click on mail media type → Change to tab “Message templates” → Edit templates → Hit the “Update” button. Don’t forget to disable the custom message feature in trigger actions if you use it.

- Add a custom message on the operation in the trigger action. This will override message templates. To configure it go to “Configuration” → “Actions” → “Trigger Actions” → Click on the action → Change to “Operations” tab → Click “Edit” operations and add your “Custom message” → Hit the “Update” button.
I always implement this useful trick at customer sites so I will share it with you. Zabbix has a macro called “{ITEM.VALUE}” that can show the collected value from the item in the moment of the problem. It can show that value in the trigger name, tags, or email notification.
Let’s say you have configured some trigger on a log event, how can you email the contents of that log? Easily, edit the message template and add “{ITEM.VALUE}” in the subject or the message like this:
Problem started at {EVENT.TIME} on {EVENT.DATE}
Problem name: {EVENT.NAME}
Host: {HOST.NAME}
Severity: {EVENT.SEVERITY}
Operational data: {EVENT.OPDATA}
Original problem ID: {EVENT.ID}
{TRIGGER.URL}

ITEM VALUES:
Item {ITEM.NAME1}: {ITEM.VALUE1}
Item {ITEM.NAME2}: {ITEM.VALUE2}
Item {ITEM.NAME3}: {ITEM.VALUE3}
Did you notice that I have added numbers at the end of each macro? What is it for? Some triggers use multiple items, in that case, you need to tell Zabbix in which order they are defined in the trigger expression.
Check supported macros by location to find out all the available macros that you can use in Zabbix notifications.
Step 6: Learn about common Zabbix mail notifications errors
Most problems with Zabbix notifications are related to network problems (firewall, ACL), badly implemented triggers and overloaded Zabbix server processes that handle notifications and escalations (alerter and escalator).
Make sure that SMTP port (25, 587, 2525 or what ever you use) is permitted on the local firewall and also on your network security device in case your email server is in another subnet.
As a general recommendation, make sure that you assign enough alerter and escalator process in the Zabbix server configuration file (default path: “/etc/zabbix/zabbix_server.conf“).
Before you start adding more processes, ask yourself have you optimized your notifications and triggers? Do you use hysteresis on triggers? Do you need all those triggers? Because in that way you will reduce the number of mail notifications and escalations and thus the load on those processes.
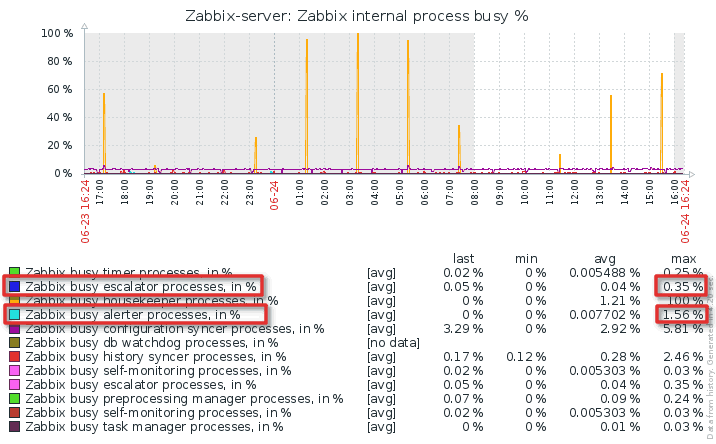
And don’t go wild and assign more processes than is necessary, it will do more harm than good. You can view how much those processes are utilized on the graph “Zabbix internal processes busy %” on the “Zabbix server” host. As a rule of thumb, increase processes gradually if they are utilized more than 60%.
Continue reading to find out how you can resolve some common notification issues.
a) How to fix “Zabbix alerter processes more than 75% busy” problem
You will receive an alarm “Zabbix alerter processes more than 75% busy” if Zabbix server needs to send a large number of notifications and there are not enough processes to handle that. This can cause even more problems because Zabbix alerts via email will be delayed and users will not react in time if a system or service is down.
Alerter processes are responsible for sending notifications and you can increase their number using parameter “StartAlerters” in the Zabbix configuration file. However, before you make any changes, view how much those processes are utilized in the last 3 days on the graph “Zabbix internal processes busy %” on the “Zabbix server” host.
Set any number between 1 and 100, the default is 3. To do this, find the line “# StartAlerters=3” in the Zabbix configuration file (default path: “/etc/zabbix/zabbix_server.conf“), uncomment it and gradually increase that number until alerter processes are less than 60% busy:
### Option: StartAlerters
#      Number of pre-forked instances of alerters.
#      Alerters send the notifications created by action operations.
#
# Mandatory: no
# Range: 0-100
# Default:
StartAlerters=10
Start with 10 and don’t forget to restart the Zabbix server after each change to the configuration file with the command:
systemctl restart zabbix-server
And remember what I said earlier, don’t assign more processes than is necessary, it will do more harm than good!
b) How to fix “Zabbix escalator processes more than 75% busy” problem
You will receive an alarm “Zabbix escalator processes more than 75% busy” if Zabbix server needs to proccess a large number of escalations (trigger actions) and there are not enough processes to handle that.
Escalator processes are responsible for processing escalations that are configured in trigger actions and you can increase their number using parameter “StartEscalators” in the Zabbix configuration file. However, before you make any changes, view how much those processes are utilized in the last 3 days on the graph “Zabbix internal processes busy %” on the “Zabbix server” host.
Set any number between 1 and 100, the default is 1. To do this, find the line “# StartEscalators=1” in the Zabbix configuration file (default path: “/etc/zabbix/zabbix_server.conf“), uncomment it and gradually increase that number until escalator processes are less than 60% busy:
### Option: StartEscalators
#      Number of pre-forked instances of escalators.
#
# Mandatory: no
# Range: 0-100
# Default:
StartEscalators=3
Start with 3 and don’t forget to restart the Zabbix server after each change to the configuration file::
systemctl restart zabbix-server
And remember what I said earlier, don’t assign more processes than is necessary, it will do more harm than good!
c) Optimize Zabbix alerts in large environments (increase concurrent sessions)
All media types are processed in parallel. The maximum number of concurrent sessions can be configured by media type, but the total number of alerter processes on the server can be limited only by the “StartAlerters” parameter in the server configuration file.
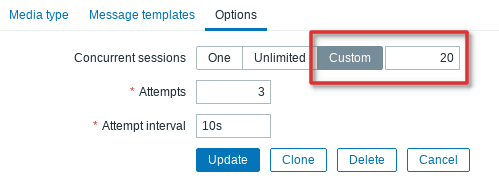
“Unlimited” mean more parallel sessions and increased notification capacity. This option should be used in large environments where you may need to send a lot of notifications at once.
To configure it go to “Administration” → “Media types” → Click on mail media type → Change to tab “Options” → Set “Concurrent sessions” to “Unlimited” or a fixed number→ Hit the “Update” button.
d) Email communication is blocked (firewall/network problems)
Check if the local firewall on the Zabbix server is permitting SMTP port. For example, to check if the Gmail SMTP server “smtp.gmail.com” is reachable via port 587 use this command on the Zabbix server:
root@zabbix_server:~$ telnet smtp.gmail.com 587
Trying 2a00:1450:400c:c02::6d…
Connected to smtp.gmail.com.
Escape character is '^]'.
220 smtp.gmail.com ESMTP 67sm28152120wrk.49 - gsmtp
If you receive “Connected to <smtp server>” than SMTP communication is working, otherwise check your local firewall and also your network security device in case your mail server is in another subnet. Here are instructions on how to update firewall rules so that the Zabbix server can send emails to the Gmail SMTP server.
Use these commands to open TCP port 587 on CentOS / RHEL server where Zabbix server is installed:
firewall-cmd --permanent --zone=public --add-port=587/tcp
firewall-cmd --reload
And if you have an UFW firewall installed on Ubuntu / Debian / Rasbian, you can use this command to permit SMTP port 587.
sudo ufw allow 587/tcp
e) Cleaning Zabbix alerts and escalations from the database (stopping email alerts)
People make mistakes all the time, one wrongly configured trigger on a crucial template can generate millions of alarms. When something like that happens it will take Zabbix days to process all the alerts and while he is doing that no one will receive notifications about new problems because they are on the end of the alert queue.
Luckily, there is a solution for that. Stop Zabbix alerts and escalations directly on the MySQL / MariaDB using these commands :
UPDATE alerts SET status=2,error='' WHERE status=0 AND alerttype=0;
Alternatively, you can truncate (delete) alerts from tables with the command “TRUNCATE alerts;” if you don’t care about the alert history.
You can delete escalations with this command:
TRUNCATE escalations;
Thanks for such a detailed explanation on Zabbix alert management. I appreciate all your effort, I wish you can do this on the configuration of items and host group.
Just needed to say THANK YOU. Clearly understood instructions. I’ve got the email test working. Created an action. Now just need to setup ICMP to monitor an item and send email when it is down for 3 minutes and again when it is online for 30 seconds. Not sure these instructions are here. If not, if you could do that I know many like myself would appreciate it! Thanks again
Just what I need to find a solution to my problem
Thank you
Hi
I reinstalled the zabbix server on the ubuntu 20.04 server with installation guide. I configured media tyeps, smtp settings and created test action.i tested it. Everything is ok. I got actions with email notification. But it didnt work again. Thats weird. I tryed with other triggers. Unfurtanately problem occoured but i cannot get actions.
Hello
i have a problem about zabbix actions. when problem occour on a host i cant recieve actions. mail test is correct but i cant get actions with email notification. i edited zabbix_server.conf as StartActions=3 but same problem continues
Is the action in a failed state? What error do you receive on the alarm under the column “Actions” on the “Problems” tool?
actions column is empty but problems display correctly
Please repeat all the steps again, you have probably misconfigured something or missed an important step.