
In this tutorial, I will show you how to install Zabbix agent (Linux) on Ubuntu, CentOS, RHEL, Debian, Rasbian (Raspberry Pi) and how to monitor Linux server with Zabbix monitoring system.
You can use this guide to install Zabbix Agent 5.0 or 6.0 LTS version on almost any popular Linux distributions:
- Ubuntu 20.04 LTS (Focal), Ubuntu 18.04 LTS (Bionic), Ubuntu 16.04 LTS, and Ubuntu 14.04 LTS
- RHEL / CentOS 8, RHEL / CentOS 7, and RHEL / CentOS 6
- Debian 11 (Bullseye), Debian 10 (Buster), Debian 9 (Stretch), and Debian 8 (Jessie)
- Rasberry Pi OS (Rasbian 10, 9, and 8)
Installing and configuring Zabbix Agent on Linux is a fairly straightforward task and only takes a few minutes, but if you want to know more then read the full article.
In short, Zabbix agent is a lightweight application that can collect various performance data from the operating system – such as CPU, memory, disk, and network interface utilization – and forward it to a central point (server) for storage and visualization. It runs on any modern operating system and is very flexible because its functionality can be extended with scripts and modules.
You can read more about the Zabbix agent on the Zabbix official site and if you stumbled on this tutorial by accident and you never heard of the Zabbix monitoring system, then stop whatever you doing and install it on your favorite Linux distribution in less than 10 minutes: CentOS/RHEL, Ubuntu, Debian, Raspberry (Rasbian).
Need help with installing Zabbix agent on Windows OS? Check out this guide:
Install Zabbix Agent on Windows (msi) | Server Monitoring Guide
Table of Contents
- Step 1: Configure repository and install Zabbix agent
- Step 2: Configure Zabbix agent on Linux OS
- Step 3: Start Zabbix agent and set it to boot on startup
- Step 4: Configure firewall for the Zabbix agent
- Step 5: Add Linux host to Zabbix monitoring system
- Step 6: Check if Zabbix Agent is working correctly
- Step 7: Configure auto registration for Linux Zabbix Agents
- Step 8: Configure PSK encryption on the Zabbix Agent (Linux)
- Step 9: Understanding Active vs Passive Zabbix Agent mode
Step 1: Configure repository and install Zabbix agent
In this tutorial, I will use the latest Zabbix agent 6.0 LTS version, that version is compatible with Zabbix server 6.x or newer. However, if you are still on Zabbix server 5.x then use agent 5.0 LTS version.
Select the appropriate OS repository and install the Zabbix agent using the provided instructions.
a. Ubuntu 20.04 / 18.04 / 16.04 / 14.04
Zabbix 6.0 LTS version (supported until February, 2027)
sudo wget https://repo.zabbix.com/zabbix/6.0/ubuntu/pool/main/z/zabbix-release/zabbix-release_6.0-1+ubuntu$(lsb_release -rs)_all.deb
sudo dpkg -i zabbix-release_6.0-1+ubuntu$(lsb_release -rs)_all.deb

                              OR

Zabbix 5.0 LTS version (supported until May 31, 2025)
sudo wget https://repo.zabbix.com/zabbix/5.0/ubuntu/pool/main/z/zabbix-release/zabbix-release_5.0-1+$(lsb_release -sc)_all.deb
sudo dpkg -i zabbix-release_5.0-1+$(lsb_release -sc)_all.deb
sudo apt update
sudo apt -y install zabbix-agent
b. RHEL & Centos 8 / 7 / 6
Zabbix 6.0 LTS version (supported until February, 2027)
rpm -Uvh https://repo.zabbix.com/zabbix/6.0/rhel/$(rpm -E %{rhel})/x86_64/zabbix-release-6.0-1.el$(rpm -E %{rhel}).noarch.rpm

                             OR

Zabbix 5.0 LTS version (supported until May 31, 2025)
rpm -Uvh https://repo.zabbix.com/zabbix/5.0/rhel/$(rpm -E %{rhel})/x86_64/zabbix-release-5.0-1.el$(rpm -E %{rhel}).noarch.rpm
yum clean all
yum -y install zabbix-agent
c. Debian 11 / 10 / 9 / 8
Zabbix 6.0 LTS version (supported until February, 2027)
sudo wget https://repo.zabbix.com/zabbix/6.0/debian/pool/main/z/zabbix-release/zabbix-release_6.0-1+debian$(cut -d"." -f1 /etc/debian_version)_all.deb
dpkg -i zabbix-release_6.0-1+debian$(cut -d"." -f1 /etc/debian_version)_all.deb

                              OR

Zabbix 5.0 LTS version (supported until May 31, 2025)
sudo wget https://repo.zabbix.com/zabbix/5.0/debian/pool/main/z/zabbix-release/zabbix-release_5.0-2+debian$(cut -d"." -f1 /etc/debian_version)_all.deb
sudo dpkg -i zabbix-release_5.0-2+debian$(cut -d"." -f1 /etc/debian_version)_all.deb
After you have downloaded the appropriate Debian repository don’t forget to run these two commands:
sudo apt update
sudo apt -y install zabbix-agent
d. Raspberry Pi OS (Rasbian) 10 / 9
Zabbix 6.0 LTS version (supported until February, 2027)
sudo wget https://repo.zabbix.com/zabbix/6.0/raspbian/pool/main/z/zabbix-release/zabbix-release_6.0-1+debian$(cut -d"." -f1 /etc/debian_version)_all.deb
sudo dpkg -i zabbix-release_6.0-1+debian$(cut -d"." -f1 /etc/debian_version)_all.deb

                             OR

Zabbix 5.0 LTS version (supported until May 31, 2025)
sudo wget https://repo.zabbix.com/zabbix/5.0/raspbian/pool/main/z/zabbix-release/zabbix-release_5.0-1+debian$(cut -d"." -f1 /etc/debian_version)_all.deb
sudo dpkg -i zabbix-release_5.0-1+debian$(cut -d"." -f1 /etc/debian_version)_all.deb
sudo apt update
sudo apt -y install zabbix-agent
Step 2: Configure Zabbix agent on Linux OS
Keep in mind that in this tutorial I will use a Zabbix server with IP address 192.168.5.43 to monitor a Linux server called l01mylab that has IP address 192.168.5.114 – don’t forget to change those settings to match your environment. Feel free to check the official Zabbix documentation if you need more information about Zabbix agent configuration parameters.
Let’s update some Zabbix agent configuration parameters, open Zabbix agent configuration file with with your favorite text editor:
sudo nano /etc/zabbix/zabbix_agentd.conf
And update these parameters:
Server=192.168.5.43
ServerActive=192.168.5.43
HostMetadata=Linux
HostnameItem=system.hostname
In the “Server” and “ServerActive” parameters put the IP address of your Zabbix server or proxy!
“HostMetadata” can be anything, any description of the system or a word that can help you later on in auto-registration process on the Zabbix frontend.
“HostnameItem” parameter will automatically generate a hostname that is defined on the Linux server, however by default that parameter is ignored if the “Hostname” parameter is defined. You can either enter a hostname manually in the “Hostname” parameter or you can you let Zabbix agent do that automatically by commenting the “Hostname=" line:
#Hostname=Zabbix Server
Finally, you must restart the Zabbix agent for the configuration to apply, so go to the next step.
Step 3: Start Zabbix agent and set it to boot on startup
Don’t forget to restart Zabbix agent service and set it to always start on boot with the “enable” command.
sudo systemctl restart zabbix-agent
sudo systemctl enable zabbix-agent
Sometimes you will need to check / start / stop Zabbix agent service, so use “systemctl” tool to do so:
sudo systemctl <status/restart/start/stop> zabbix-agent
Step 4: Configure firewall for the Zabbix agent
Zabbix agent, that is running in passive mode, must be able to respond to the Zabbix server inquiries over TCP port 10050.
Use these commands to open TCP port 10050 on CentOS / RHEL server where Zabbix agent is installed:
firewall-cmd --permanent --zone=public --add-port=10050/tcp
firewall-cmd --reload
And if you have an UFW firewall installed on Ubuntu / Debian / Rasbian, you can use this command to permit Zabbix agent TCP port 10050:
sudo ufw allow 10050/tcp
WELL DONE!
You have successfully installed and configured Zabbix agent on your Linux OS!
Now it’s time to add that Linux host to Zabbix monitoring system.
Step 5: Add Linux host to Zabbix monitoring system
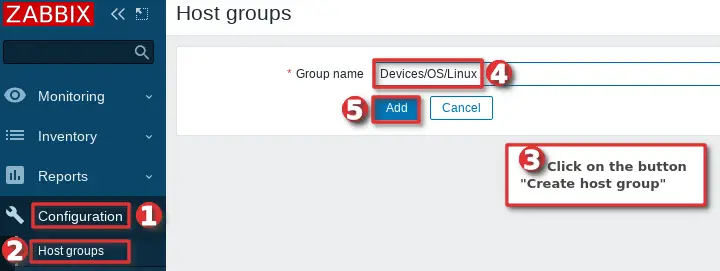
You can add a host to existing host group or you can create a new host group for your Linux servers. I will create host group “Devices/OS/Linux“ using “Host groups” option under “Configuration” section on the Zabbix frontend. Click “Create host group” button, define “Group name” and click “Add” (you only need to create host group once):
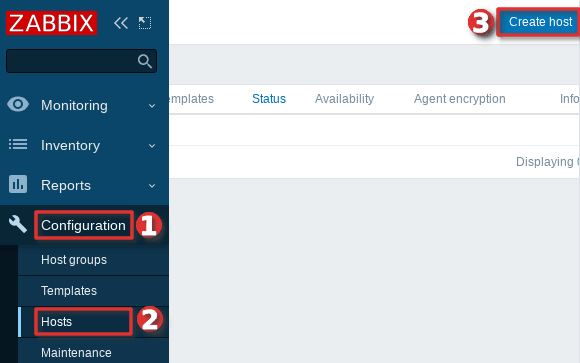
Navigate to “Host” menu under “Configuration” tab and then click “Create host” option to create a host in Zabbix:
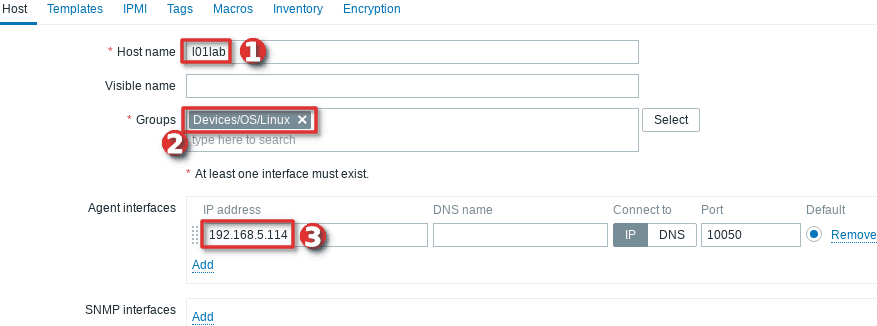
Define “Hostname” and set “Groups” using your newly created host group. Then set the IP address of the Linux server under “Agent interfaces” section
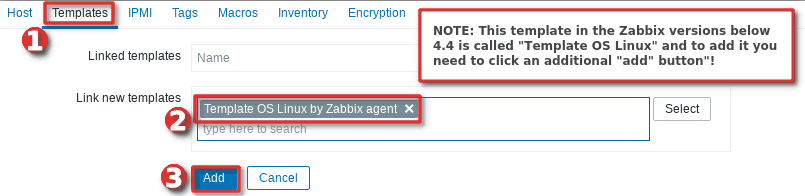
Switch to tab “Templates” and choose the “Template OS Linux by Zabbix agent” template under section “Link new template” by typing “OS Linux” and click the “Add” button to add the host to Zabbix.
And you’re done! If you are interested in automating this whole process of adding Linux hosts to Zabbix see the section “Configure auto registration for Linux Zabbix agents“
Note that in this tutorial I m using a template “Template OS Linux by Zabbix agent” that can only monitor passive Zabbix agents. However, if you want to monitor your host using Zabbix agents in active mode use a template called “Template OS Linux by Zabbix agent active“.
Check out the section “Understanding Active vs Passive Zabbix Agent mode” to learn more about the differences between the active and passive agent mode.
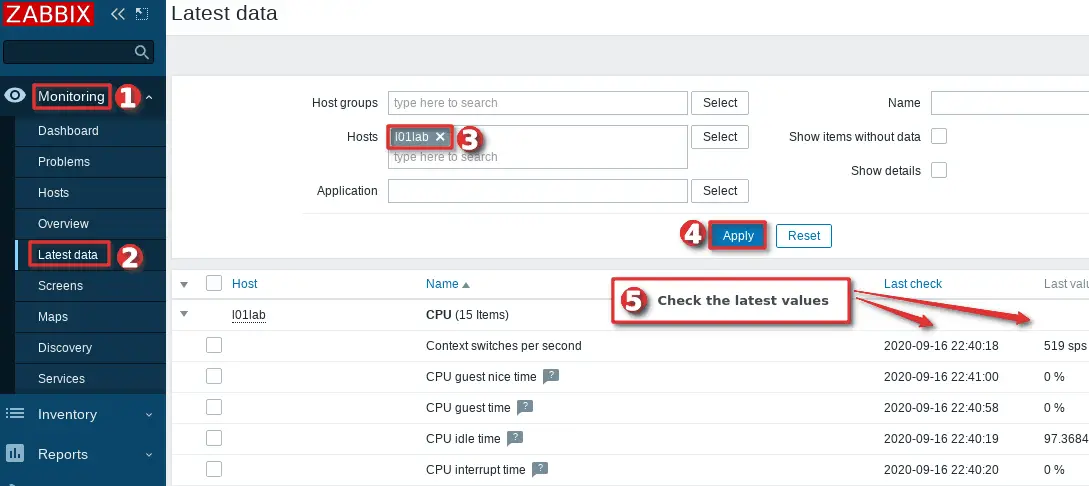
Step 6: Check if Zabbix Agent is working correctly
You can check that the Zabbix agent is working properly by using the “Latest Data” option on the Zabbix frontend. Wait up to 5 minutes after you have installed and started Zabbix agent to allow for data to be collected. Look at columns “Last check” and “Latest value” just as showing in the image below and if they are updating then the agent is working.
Your agent should be working and collecting data by now, but if you experience any problems, restart the Zabbix agent and check the log “/var/log/zabbix/zabbix_agentd.log“. And if there is nothing unusual in the log file then check the firewall – make sure that TCP port 10050 on the host (where Zabbix agent is installed) and TCP port 10051 on the Zabbix server side are open.
CONGRATULATIONS!
You have successfully installed Zabbix Agent and your Linux server is being monitored!
No need to do anything else as other steps are optional!
CONTINUE TO LEARN MORE:
Auto registration of Zabbix agents (Linux OS)
Learn how to Secure Zabbix Agent
Understanding Active vs Passive Zabbix Agent mod
Step 7: Configure auto registration for Linux Zabbix Agents
Adding one or two hosts to Zabbix manually is not a big problem. However, what if you need to add more servers to Zabbix? Or you just want to automate that tedious process of adding Linux hosts to Zabbix and linking them with the correct template and host group?
Don’t worry, you don’t have to write the script because Zabbix has a tool called “Auto registration”
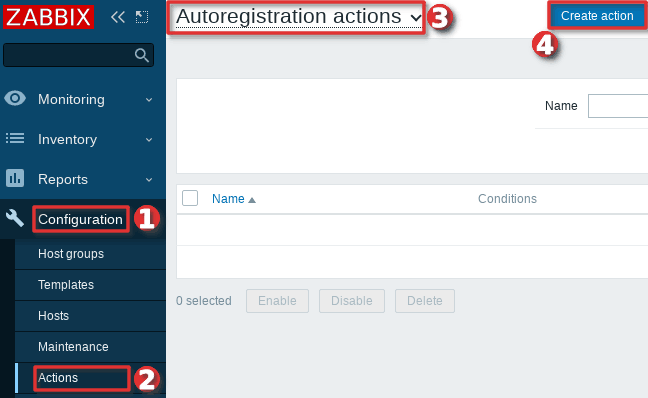
Go to the “Actions” tool under the “Configuration” section, then select “Auto registration” option and click the “Create action” button.
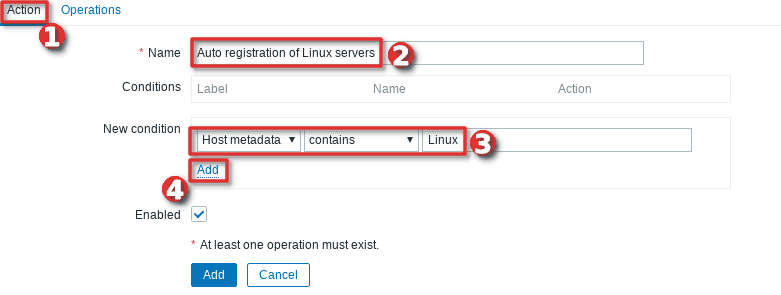
On the “Action” tab define the “Name” of the action and add a “New condition” that will check if the “Host metadata” contains the word “Linux”.
Then, change tab to “Operations” and add new operation.
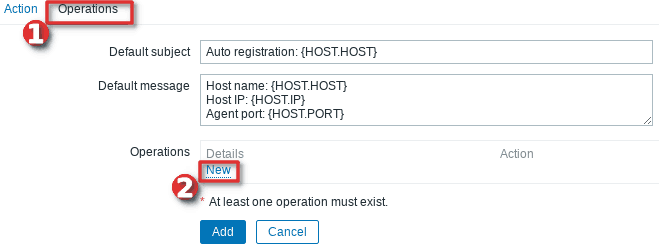
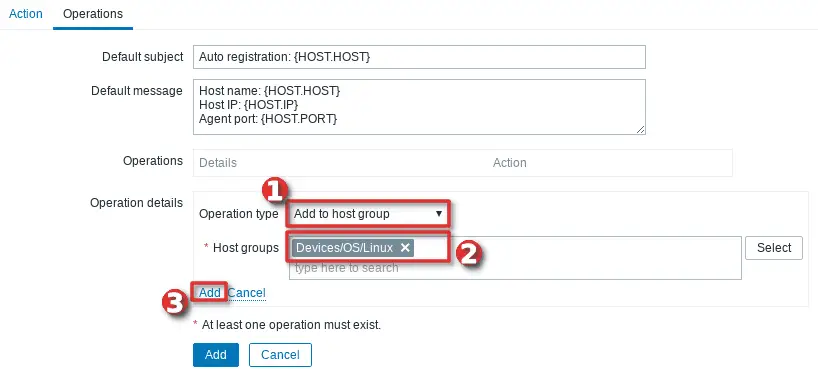
Define “Operation type” as “Add to host group” and then select to which “Host groups” will Linux hosts be added when discovered. In my case, I will use my custom host group called “Devices/OS/Linux“.
After that, you need to add a new operation by setting “Link to the template” as “Operation type” and then select which templates will be linked with the newly discovered Linux hosts. In my example, I will use template “Template OS Linux by Zabbix agent” (passive checks).
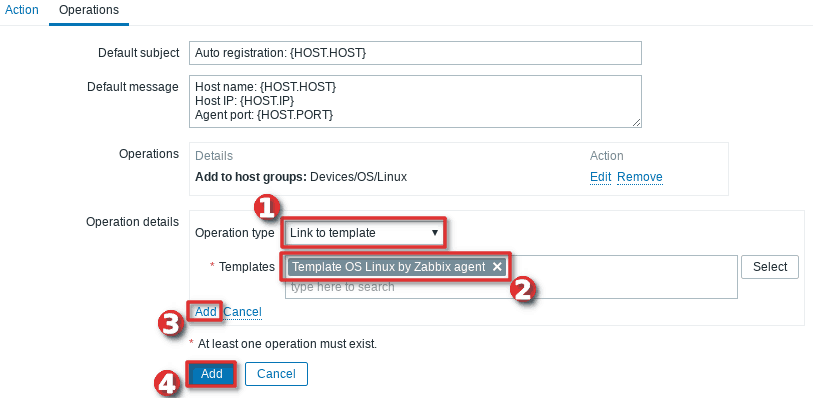
Well done! Auto-registration is configured. Wait a few minutes and your Linux server should appear in Zabbix. From now on, every time you install a Zabbix agent on a Linux OS, it will automatically be added to the Zabbix and linked with the appropriate host group and template.
Using PSK encryption on the Zabbix agents? Then there is one more step left, you need to add your PSK identity and PSK key using the “Auto Registration” option under the “Administration“→”General” section just as shown in the image below:

From now on, during the auto registration process, Zabbix will configure provided PSK identity and key on each registered host.
Step 8: Configure PSK encryption on the Zabbix Agent (Linux)
Zabbix supports encrypted communications between Zabbix server and Zabbix agent using Transport Layer Security (TLS) protocol v.1.2. You can use certificate-based and pre-shared key-based encryption (PSK), but in this tutorial we will configure PSK encryption.
a. Generate PSK key
Generate 256-bit (32 bytes) PSK key with openssl tool and save it with command:
sudo openssl rand -hex 32 > /etc/zabbix/zabbix_agent.psk
And set the correct file permission on the newly created file:
sudo chown zabbix:zabbix /etc/zabbix/zabbix_agent.psk
sudo chmod 700 /etc/zabbix/zabbix_agent.psk
Remember that you can always read your PSK key from the “zabbix_agent.psk” file :
cat /etc/zabbix/zabbix_agent.psk
41583637152f3d240cc64ee4a58b02c4e696526feb137833c40ca642ce283a3c
b. Configure Zabbix agent to support PSK encryption
Open “zabbix_agentd.conf” file with command “sudo vi /etc/zabbix/zabbix_agentd.conf” and add this configuration anywhere in file:
TLSConnect=psk
TLSAccept=psk
TLSPSKFile=/etc/zabbix/zabbix_agent.psk
TLSPSKIdentity=ZBX-AGENT-PSK-ID
Save and exit file. Keep in mind that “TLSPSKIdentity” can be anything, so for security reasons set something else – don’t use mine!
Don’t forget to restart Zabbix agent service after changing the configuration file:
sudo systemctl restart zabbix-agent
c. Enable PSK encryption on the agent in Zabbix frontend
Communication between Zabbix agent and server is not yet encrypted because we have enabled PSK encryption on the agent side but not on the server side.
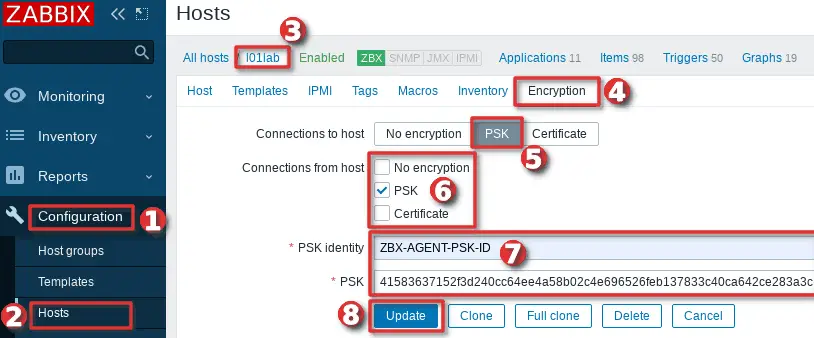
We need to enable encryption on the server side so go to web frontend and select your “Hosts” tab under the “Configuration” section and find and click on your Linux hosts.
On the “Encryption” tab set PSK under “Connections from hosts” option and copy/paste “PSK identity” and “PSK” (key) that is configured on the Zabbix agent.
When you are done with configuration click the “Update” button just as shown in the image below.
Keep in mind, that you can automate the configuration of the host encryption (PSK) on the frontend using the Zabbix auto registration process.
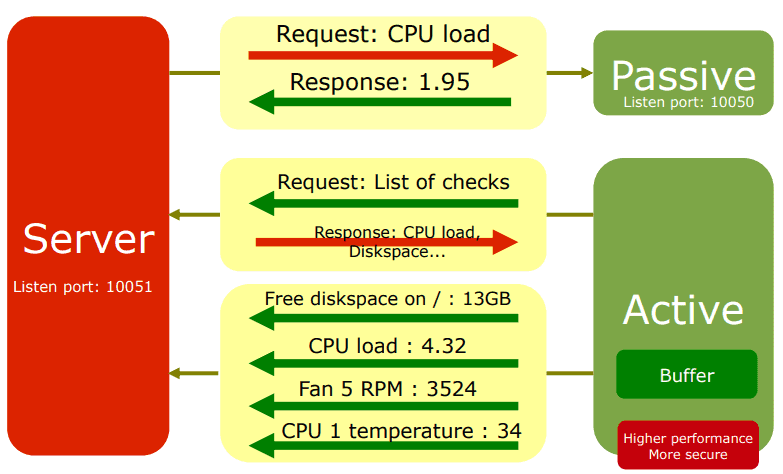
Step 9: Understanding Active vs Passive Zabbix Agent mode
When using a Zabbix agent in active mode, it will connect to the Zabbix server via port 10051 to retrieve configuration and send data. This is a great feature that allows an active Zabbix agent to work behind the firewall and to offload the Zabbix server in large environments.
On the other hand, if you use a Zabbix agent in passive mode Zabbix server will initiate a connection via port 10050 and retrieve data from the agent. The Zabbix server will do this for every metric (item) every few minutes – which is very inefficient! Because of this, active mode is more recommended.
An additional advantage of the Zabbix agent in active mode is that it can read logs from the device and that is not possible if the Zabbix agent is used in passive mode.
You can detect on Zabbix host if the agent is working in active or passive mode. Passive mode will show red or green “ZBX” icon in the agent status bar and active mode will show grey “ZBX” icon:

Thank you for reading.
Learn how to setup Zabbix email notifications and escalations in a few minutes!

Is there a way to update the default IP of the interface in case the host changes IP?
Thanks
Does it make sense to run an agent in both active and passive mode?
It seems like it would keep a host from showing as unknown status on the dashboard.
It makes sense, the passive mode comes handy when troubleshooting problems, you can use the zabbix_get tool to poll information from the agent. The agent availability check can be more reliable with the passive mode. Also, as you said, you don’t have that unknown status on the host with an agent that works in passive mode.
Regards