In this guide I will show you how to configure SNMPv3 on Cisco IOS, IOS-XE, IOS-XR based routers and switches, ASA firewalls and Nexus switches (OS-NX) with examples.
SNMP, which stands for Simple Network Management Protocol, is a communication protocol that allows discovery, monitoring, and configuration of SNMP compatible devices that are connected to the network. You can find more about SNMP in: What is SNMP? How does it work? Learn with examples.
Table of Contents
SNMPv2 is so easy – why do we need SNMPv3?
SNMP v2c configuration is pretty straight forward on all Cisco devices, you only need to define a password called community string:
Cisco IOS, IOS-XE, IOS-XR and OS-NX
snmp-server community <your-community> RO

Cisco ASA
snmp-server community  <your-community> snmp-server contact  <your-contact>
snmp-server location <your-location> snmp-server host <interface> <NMS-IP>
    poll community <your-community> version 2c
ASA firewall has an additional line of configuration, but still, it is very simple to configure. However, there is a big problem with SNMPv1 and v2, they use plain text password (community string) that could be sniffed from network traffic.
Therefore, SNMP v3 is recommended because of authentication and privacy (encryption) support.

The SNMPv3 supports the following set of security levels (RFC 2574):
- noAuthnoPriv – communication without Authentication and Privacy (Encryption)
- authNoPriv – communication with Authentication (MD5 or SHA) but without Privacy.
- authPriv – communication with Authentication (MD5 or SHA) and Privacy (DES or AES).
Enough of theory, let’s configure SNMPv3 on Cisco devices!
SNMPv3 configuration on Cisco Devices
Configuration of SNMP v3 on Cisco devices is done using these steps: create view; create group; create user and define destination host (last step is required for ASA, but optional for others).
We will configure SNMP v3 with authentication and privacy (option authPriv) using next parameters:
- Username: UserJustMe
- Authentication Password: AuthPass1
- Privacy Password: PrivPass2
- View Name: ViewDefault
- Group Name: GrpMonitoring
Classic IOS & IOS-XE
This SNMP configuration will work on all devices that use classic IOS (like Cisco Catalyst 3650, 3750, 3850, 2960, 2950, 2801, 2911 or routers 1841, 1921 etc.) and IOS-XE (like ASR1000, Catalyst 9000…).
snmp-server view ViewDefault iso included
snmp-server group GrpMonitoring v3 priv read ViewDefault
snmp-server user UserJustMe GrpMonitoring v3 auth sha AuthPass1 priv aes 128 PrivPass2
Note that SNMP users are not stored in running or startup configuration, so the “snmp-server user” line will not be visible via “show running-config”.
IOS-XR based Routers
This configuration will work on device that use IOS-XR (like CRS series, 12000 series, and ASR9000 series…)
snmp-server view ViewDefault iso included
snmp-server group GrpMonitoring v3 priv read ViewDefault
snmp-server user UserJustMe GrpMonitoring v3 auth sha AuthPass1 priv aes 128 PrivPass2
Nexus Switch (OS-NX)
SNMP groups on Nexus (like series 7000, 9000 .. ) are replaced by roles for Role-Based Access Control and by default new users will have network-operator permissions. As a side effect, they can log-in via CLI to the switch and have access to all show commands.
Use “role” set of commands because they can be used as groups in SNMP.
snmp-server user UserJustMe network-admin v3 auth sha AuthPass1 priv aes-128 PrivPass2
ASA firewall
snmp-server group GrpMonitoring v3 priv
snmp-server user UserJustMe GrpMonitoring v3 auth sha AuthPass1 priv aes 128 PrivPass2
snmp-server host mgmt 10.1.1.161 version 3 UserJustMe
In this example, I have used the “mgmt” interface for SNMP communication with a monitoring system (NMS) with IP address “10.1.1.161.” You probably have a different network configuration, so change the interface and IP address.
Testing SNMPv3 configuration with Net-SNMP
My favorite tool for testing SNMP is Net-SNMP. There is also a Windows version of the Net-SNMP tool but I recommend the 100% free SnmpB MIB browser instead to test SNMP and manage MIBs on Windows.
On Ubuntu/Debian you can install Net-SNMP tools with one simple command: “apt-get install snmp“, or if you have CentOS/RHEL you can use “yum install net-snmp net-snmp-utils“.
To verify that SNMPv3 is working as configured run the following Net-SNMP command from Linux machine. Change the username and passwords if you have used different ones.
snmpwalk -v3 -l authPriv -u UserJustMe -a SHA -A AuthPass1 -x AES -X PrivPass2 10.7.1.9:161 sysDescr
Net-SNMP snmpwalk command explained:
snmpwalk -v3 -l <noAuthNoPriv|authNoPriv|authPriv> -u <username> [-a <MD5|SHA>] [-A <authphrase>]
   [-x <DES|AES>] [-X <privaphrase>] <ipaddress>[:<dest_port>] [oid]
Need more examples for Net-SNMP tool? Check out my post about snmpwalk, snmpget, snmpset and snmptrap examples.
CONGRATULATIONS!
Now you know how to configure SNMP v3 on all Cisco devices!
CONTINUE TO LEARN MORE:
How to configure SNMP v3 Traps, Informs and Context Name.
Configuring SNMPv3 Traps / Informs
In the first section of this tutorial, we have learned how to configure Cisco devices for SNMP polling, and now it’s time for SNMP traps (don’t know the differences between poll and trap?).
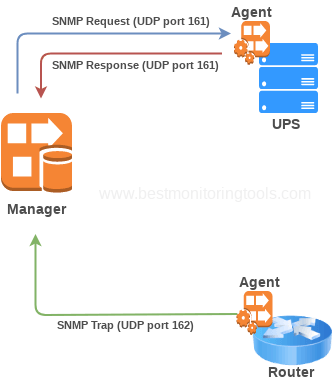
Traps are messages that are sent from the device (SNMP agent) and received by the monitoring software (SNMP manager) on UDP port 162.
For better reliability, you can also use Inform that is basically a trap with acknowledge.
You can use noAuth, Auth or Priv security options for traps/informs and in this tutorial we will configure SNMP notifications in 4 different ways:
- Traps without Authentication and Privacy
- Traps with only Authentication
- Traps with Authentication and Privacy (encryption)
- Informs with Authentication and Privacy (encryption)
Enable Traps without Authentication / Privacy
! Enable all traps
snmp-server enable traps
!
! …or insted select just some traps, for example:
! snmp-server enable traps envmon fan shutdown supply temperature status ospf cpu
!
snmp-server group trapgroup v3 noauth
snmp-server user trapuser trapgroup v3
snmp-server host 10.1.1.161 traps version 3 noauth trapuser
! Trap receiver must also have user defined locally.
Enable Traps with only Authentication
! Enable all traps
snmp-server enable traps
!
! …or insted select just some traps, for example:
! snmp-server enable traps envmon fan shutdown supply temperature status ospf cpu
!
snmp-server group trapgroup v3 auth
snmp-server user trapuser trapgroup v3 auth sha AuthPass
snmp-server host 10.1.1.161 traps version 3 auth trapuser
! Trap receiver must also have user and password defined locally.
Enable Traps with Authentication and Privacy
! Enables all traps
snmp-server enable traps
!
! …or insted select just some traps, for example:
! snmp-server enable traps envmon fan shutdown supply temperature status ospf cpu
!
snmp-server group trapgroup v3 priv
snmp-server user trapuser trapgroup v3 auth sha AuthPass priv 3des PrivPass
snmp-server host 10.1.1.161 traps version 3 priv trapuser
! Trap receiver must also have user and password defined locally.
Enable Informs with Authentication and Privacy
! Enables all traps
snmp-server enable traps
!
! …or insted select just some traps, for example:
! snmp-server enable traps envmon fan shutdown supply temperature status ospf cpu
!
! EngineID is automatically generated by the router, use "show snmp engineID" to check
snmp-server engineID remote 10.1.1.161 800005E510763D0FFC1245N1A4
snmp-server group trapgroup v3 priv
snmp-server user trapuser trapgroup remote 10.1.1.161 v3 auth sha AuthPass priv 3des PrivPass
snmp-server host 10.1.1.161 informs version 3 priv trapuser
!trap receiver must also have user and password defined locally.
One more thing to note, EngineID is not stored in the running configuration!
WELL DONE!
Now you know how to configure SNMP v3 Traps and Informs!
NEXT:
How to configure SNMP v3 Context Name.
SNMPv3 context name
By default, every SNMP agent assumes that there is only one MIB entity on the device. However, sometimes there can be multiple MIB entities. For example, there is BRIDGE-MIB that enables us to extract MAC address info from each VLAN using SNMP v1/v2 “Community String Indexing” like this:
snmpwalk -v2c -c public@11 192.168.1.1 1.3.6.1.2.1.17.4.3.1.1
  iso.3.6.1.2.1.17.4.3.1.1.0.30.247.172.237.111 = Hex-STRING: 00 1E E7 BC ED 6F
  iso.3.6.1.2.1.17.4.3.1.1.0.30.247.172.237.127 = Hex-STRING: 00 1E E7 BC ED 7F
  iso.3.6.1.2.1.17.4.3.1.1.0.80.86.179.5.125 = Hex-STRING: 00 50 56 C3 15 7D
Notice how I appended “@11” to community string “public” so that device SNMP knows that I need mac addresses from VLAN 11.
With SNMPv3, there is no Community String, so nothing to index with – we use context name instead.
Enabling SNMPv3 context name
Make sure that device can see the contexts with command “show snmp context“:
# Note: not supported in some devices e.g Cat2950
router#show snmp context
 vlan-1
 vlan-2
 vlan-3
Configuration of SNMPv3 context name is straightfoward:
# Add SNMPv3 context name for each vlan on device
snmp-server group GrpMonitoring v3 auth context vlan- match prefix

# Command above will not work for IOS versions before 12.4(20)T, you must add a line for each VLAN
snmp-server group GrpMonitoring v3 auth context vlan-1
snmp-server group GrpMonitoring v3 auth context vlan-30
snmp-server group GrpMonitoring v3 auth context vlan-32
You can test configuration above by manually polling a VLAN using contexts with NetSNMP tool:
# Using OID dot1dTpFdbAddress (1.3.6.1.2.1.17.4.3.1.1) and SNMPv3 context name to get mac addresses in VLAN 32
snmpwalk -v3 -l authNoPriv -u UserJustMe -a MD5 -A AuthPass1 -n vlan-32 192.168.1.1 1.3.6.1.2.1.17.4.3.1.1
That’s all there is to SNMPv3 configuration on Cisco devices!
Thank you for reading.
Learn how to monitor Cisco Switch or Router with a 100% free monitoring tool called Zabbix?


